

ROZ'S LOFT: Join me as I try new techniques and learn more about my machine and hand knitting hobby as well as living a new life in northern lower Michigan. Always an adventure!
Sunday, March 20, 2011
Stained Glass Embroidery
I've been working on and off on this stained glass embroidered wall hanging since the day I first bought them (I think the first day they came out. You can see the whole set at http://www.emblibrary.com/EL/new.aspx?date=030911 . I plan on getting a piece of upholstery fabric for the backing. Emblibrary has excellent directions for making this, I have them all printed out and following them to the "T". I am making some of the colors different than theirs but then that's the fun of machine embroidery.
 These are pretty and its fun to put the pieces together and see them match up. I haven't ever done anything like this before. As you can see, so far I have the first row completed. I finished the center piece of the second row last night but my embroidery machine messed up just a little when the bobbin thread decided it didn't want to work and the whole design shifted just a little. I can fix it and will before I start the adjoining pieces. Phooey, I know better, the machine doesn't like it when I leave it even just long enough to put the dog out and get a drink of water. That's what I get, the machine needs me. :-)


Thursday, March 17, 2011
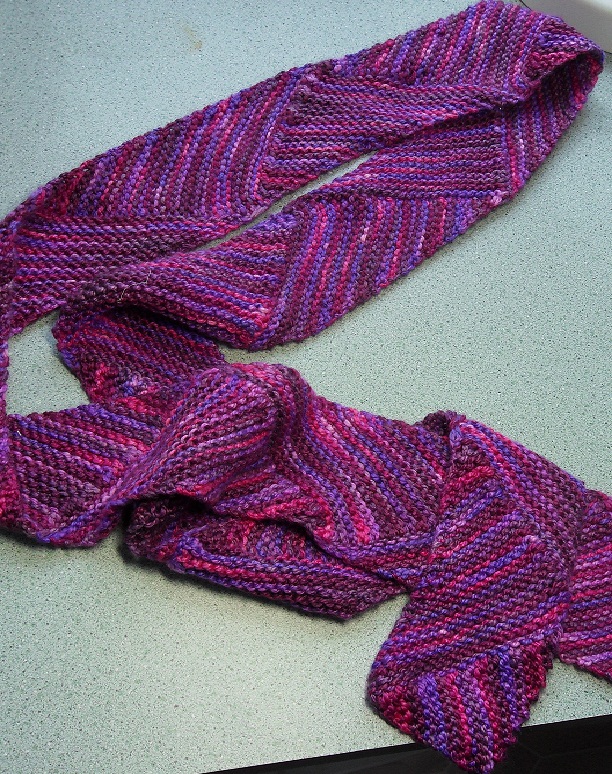
New Multidirectional Scarf
I knitted a multidirectional scarf in November (2009) and loved it but gave it to a friend. So I found some hand dyed yarn in my stash of yarn as I was trying to clean out the closets, etc...and decided to make myself one. I love the scarf. The other one was pictured in another blog note here: http://rozspot.blogspot.com/2009/11/multi-directional-scarf.html
Sunday, March 13, 2011
Saving Gas (worth a try)
I've been filling up when my gas tank is at 3/4 to 1/2 full thinking if prices go up today at least I'll save a couple pennies and won't have to totally fill up. I've also been driving slower, taking off from a full stop much slower and trying to combine trips. But, this was sent to me this morning and son of a gun, I'm going to give it a try as well.
TIPS ON PUMPING GAS
I don't know what you guys are paying for gasoline.... but here in California we are paying up to $3.75 to $4.10 per gallon. My line of work is in petroleum for about 31 years now, so here are some tricks to get more of your money's worth for every gallon:
Here at the Kinder Morgan Pipeline where I work in San Jose , CA we deliver about 4 million gallons in a 24-hour period thru the pipeline.. One day is diesel the next day is jet fuel, and gasoline, regular and premium grades. We have 34-storage tanks here with a total capacity of 16,800,000 gallons.
Only buy or fill up your car or truck in the early morning when the ground temperature is still cold.Remember that all service stations have their storage tanks buried below ground. The colder the ground the more dense the gasoline, when it gets warmer gasoline expands, so buying in the afternoon or in the evening....your gallon is not exactly a gallon. In the petroleum business, the specific gravity and the temperature of the gasoline, diesel and jet fuel, ethanol and other petroleum products plays an important role.
A 1-degree rise in temperature is a big deal for this business. But the service stations do not have temperature compensation at the pumps.
When you're filling up do not squeeze the trigger of the nozzle to a fast mode If you look you will see that the trigger has three (3) stages: low, middle, and high. You should be pumping on low mode, thereby minimizing the vapors that are created while you are pumping. All hoses at the pump have a vapor return. If you are pumping on the fast rate, some of the liquid that goes to your tank becomes vapor. Those vapors are being sucked up and back into the underground storage tank so you're getting less worth for your money.
One of the most important tips is to fill up when your gas tank is HALF FULL. The reason for this is the more gas you have in your tank the less air occupying its empty space. Gasoline evaporates faster than you can imagine. Gasoline storage tanks have an internal floating roof. This roof serves as zero clearance between the gas and the atmosphere, so it minimizes the evaporation. Unlike service stations, here where I work, every truck that we load is temperature compensated so that every gallon is actually the exact amount.
Another reminder, if there is a gasoline truck pumping into the storage tanks when you stop to buy gas, DO NOT fill up; most likely the gasoline is being stirred up as the gas is being delivered, and you might pick up some of the dirt that normally settles on the bottom.
Its 10 a.m. /Roz is on my way to fill up, my tank is 3/4 full....will I save? Good Grief, I hope so!
TIPS ON PUMPING GAS
I don't know what you guys are paying for gasoline.... but here in California we are paying up to $3.75 to $4.10 per gallon. My line of work is in petroleum for about 31 years now, so here are some tricks to get more of your money's worth for every gallon:
Here at the Kinder Morgan Pipeline where I work in San Jose , CA we deliver about 4 million gallons in a 24-hour period thru the pipeline.. One day is diesel the next day is jet fuel, and gasoline, regular and premium grades. We have 34-storage tanks here with a total capacity of 16,800,000 gallons.
Only buy or fill up your car or truck in the early morning when the ground temperature is still cold.Remember that all service stations have their storage tanks buried below ground. The colder the ground the more dense the gasoline, when it gets warmer gasoline expands, so buying in the afternoon or in the evening....your gallon is not exactly a gallon. In the petroleum business, the specific gravity and the temperature of the gasoline, diesel and jet fuel, ethanol and other petroleum products plays an important role.
A 1-degree rise in temperature is a big deal for this business. But the service stations do not have temperature compensation at the pumps.
When you're filling up do not squeeze the trigger of the nozzle to a fast mode If you look you will see that the trigger has three (3) stages: low, middle, and high. You should be pumping on low mode, thereby minimizing the vapors that are created while you are pumping. All hoses at the pump have a vapor return. If you are pumping on the fast rate, some of the liquid that goes to your tank becomes vapor. Those vapors are being sucked up and back into the underground storage tank so you're getting less worth for your money.
One of the most important tips is to fill up when your gas tank is HALF FULL. The reason for this is the more gas you have in your tank the less air occupying its empty space. Gasoline evaporates faster than you can imagine. Gasoline storage tanks have an internal floating roof. This roof serves as zero clearance between the gas and the atmosphere, so it minimizes the evaporation. Unlike service stations, here where I work, every truck that we load is temperature compensated so that every gallon is actually the exact amount.
Another reminder, if there is a gasoline truck pumping into the storage tanks when you stop to buy gas, DO NOT fill up; most likely the gasoline is being stirred up as the gas is being delivered, and you might pick up some of the dirt that normally settles on the bottom.
Its 10 a.m. /Roz is on my way to fill up, my tank is 3/4 full....will I save? Good Grief, I hope so!
Thursday, February 24, 2011
Beaded Bags On The LK 150
The larger bag was made to go inside my hand knitting bag; it will hold accessories like clippers, tape measure, tapestry needle, stitch markers, etc. The cell phone bag was made to fit a Razr 3M phone.

Materials:
1) 1 skein (4 ozs) Down Home Art Yarns Sock yarn, Turquoise Fade. from www.knitivity.com My larger bag final measurement is 5” X 8”. Cell phone bag took final measurement is 4 ½” X 2 ¼”.
2) Fabric for lining (cell phone bag isn’t lined)
3) 7 inch zipper
4) Button for cell phone bag
5) Crochet hook
6) Beads: Beaded Treasures 6/0 Czech Glass Beads from Hobby Lobby, it took 4 vials and I had beads left over. If you just make the larger bag, you will only need 3 vials.
1 package Oral B Superfloss for beading unless you have a bead tool that fits through the beads.
Machine: LK 150 mid gauge machine
Tension: Carriage was set at the lowest possible tension (R) antenna was set at 1.
Gauge: 11.4 rows per inch, 5.7 stitches per inch but gauge isn’t really all that important unless you know exactly how big you want your little bag to be.
Machine Knit Technique: The bags were knitted and woven with the skein of yarn I bought from knitivity.com. I chose to weave it because I thought it needed to be thicker and I didn’t think I’d have enough yarn to double it for a heavy stockinette. Weaving takes very little yarn and I actually ended up with
2 ounces left after I made the 2 bags.

Picture above shows the woven side of the weaving
I did want the stockinette side to be the right side though so although I like the woven side, it will be hidden by a lining.
Stitch Pattern: Knit weave 2 rows, place a bead on every other stitch every 3rd row alternating the stitches where the beads will be placed. By always starting your beading from the carriage side of the work, you can start with stitch 4 each side stitch 2 and your beads will be alternated every 3rd row. Also because you have 44 stitches on the needle bed you can start weaving each side with a yarn over so you won’t get lost trying to figure out if you’re supposed to do a yarn over or a yarn under, its hard to tell when you’re using the same yarn for knitting and weaving.
Wind your yarn into a ball and then put it on an ounce scale. Wind half off into another ball. Knit the first side and switch balls for the second side.
I have a bead tool and the beads I wanted to use didn’t fit on it.
Thanks to zackDS@comcast.net for the following directions:
“I use Oral B Superfloss. Use the smooth stiff part like a needle and thread as many beads as needed for each row. Tie a knot below the fluffy part so the beads won’t fall off although the fluffy part usually holds them on.”
(NOTE: I tied the floss in a bow knot below the fluffy part so that the beads wouldn’t fall off the other end (just in case).
Directions:
With waste yarn cast on 44 stitches and knit a few rows, knit 1 row with ravel cord
Ewrap cast on over the ravel cord with your main yarn.
Knit one row over the cast on row (carriage on L)—we won’t count this row.
Row 1: Carriage on L, begin weaving starting with needle 1, over, needle 2 under--over and under, over and under (1x1 weave). ) you’ll end with a yarn under at the end of each row and start each row with a yarn over. Knit across, carriage ends on the R.
Row 2: Knit weave this row end with carriage on L.
Row 3: Load 20 beads onto your floss and begin on the carriage side (L) start with stitch 4 and put a bead on every other stitch ending with 2 empty stitches remaining on the R.
Weave your yarn across the bed and then knit across the row slowly. Don’t force the carriage.
Row 4 and 5, knitweave
Row 6: bead across starting with the 4th stitch on carriage side.
Continue weaving putting beads on alternate stitches as above on row 6, 9, 12, 15, 18, etc as above to row 51, continue weaving-only to row 55.
Finishing:
When finished, pin the 2 pieces out on a blocking board and steam to set stitches. Crab Stitch the 2 top sides of your purse before installing zipper. Hand baste the zipper into the 2 top pieces. Once it’s basted by hand, take to sewing machine and sew zipper in, be careful not to sew through your crab stitches.
Now measure and cut out your lining fabric in 1 piece, folded at the bottom.
Mattress stitch the 2 sides of your knitted purse together and turn inside out to sew bottom and weave your ends in. Insert the lining and hand stitch the top to the zipper facing, hiding your zipper stitches if you want. Don't you love how my lining happens to match the yarn? Its Laurel Burch fabric, I bought in a quilt kit when visiting in Tacoma, WA. Never will make the quilt I'm having too much fun with the fabric pieces.

Cell Phone Holder
Yarn Used, ½ ounce
Technique, knit weave on LK 150 as above
Cell phone bag isn’t lined because I made it snug so it would stretch a little wider to fit phone.
Cast on 16 stitches with waste yarn and ravel cord (as above)
Knit 1 row plan and start knit weaving and beading as above beading on row 3, 6, 9, 12, etc. Continue to row 108. Stop beading and knit weave 2 more rows. (end RC 110).
Pin your piece out on a blocking mat and steam to set stitches.
Fold piece over your cell phone and determine where you’ll want the bottom to fold. Sew up the sides using that measurement. Crab stitch around the entire top of the bag. Sew button on and crochet a chain buttonhole to fit button. (I found a mother-of-pearl button that looks so great with the beads).

BONUS BAG
 Since I had yarn and beads left over after the first 2 bags I decided I’d make an iPod bag that would hang around my neck when I walk. I wanted the iPod along with its case in the bag because I feel like it’s a likely thing to get broken without its case. The iPod in its case measures 6 ¼” around its width and is 5” long. I decided to decorate it with beads rather than knit beads in every 3rd row and it’s infinitely faster that way.
DIRECTIONS
Cast on with waste yarn 16 stitches and knit a few rows. Knit 1 row with ravel cord.
With main yarn knit 1 row and then begin weaving as we did with the other 2 bags. Knit and weave 115 rows. Cut your weaving yarn and latch tool bind off with the main yarn. Crochet a crab stitch around the top.
Double the yarn and knit a 3 stitch ICord (knit 1 way, slip the other way). I’m sorry I didn’t count how many rows of ICord I knitted, I knitted until it was 30 inches long. I attached it to the 2 sides of the bag.
POCKET I decided to make a pocket for the ear buds because they are always in the bottom of my purse or pocket, all mixed up with pens, comb, etc and how handy is it to have them right there in the bag with the iPod.
With waste yarn cast on 12 stitches and knit a few rows. Knit 1 row with ravel cord.
With main yarn and weaving yarn, knit weave 11 rows as above.
ROW 12 start the diamond pattern with beads. Center 2 beads on the first row, 4 beads on the second row, 6 beads on the third row, 4 beads on the fourth row and 2 beads on the 5th row. Feel free to make your own bead pattern or omit it altogether.
ROW 17 continue knit weave to row 29.
Cut weaving yarn and latch tool bind off with main yarn.
Sew pocket to front of bag leaving the top open. If you wish, crochet a crab stitch across the top of the pocket. Steam the bag and you’re ready to walk.
By the way, I still have 1.1 ounce of yarn left over, enough for another little bag.
These bags won first place in a 1 skein contest that Ray at Knitivity.com was sponsoring. Maybe they won because they were the only entry but I like to believe they won because they came out so great and I made so many things with that one skein of yarn. What did I win? Why, another skein of yarn (different color). Maybe I'll post a picture and pattern of what I made with that skein some day...........
ps. apologize for the quality of the pictures, I had to scan them from the original pattern and they never come out as nice as if I'd taken a new picture.
Copyright © 2009, Rosalind Porter

Materials:
1) 1 skein (4 ozs) Down Home Art Yarns Sock yarn, Turquoise Fade. from www.knitivity.com My larger bag final measurement is 5” X 8”. Cell phone bag took final measurement is 4 ½” X 2 ¼”.
2) Fabric for lining (cell phone bag isn’t lined)
3) 7 inch zipper
4) Button for cell phone bag
5) Crochet hook
6) Beads: Beaded Treasures 6/0 Czech Glass Beads from Hobby Lobby, it took 4 vials and I had beads left over. If you just make the larger bag, you will only need 3 vials.
1 package Oral B Superfloss for beading unless you have a bead tool that fits through the beads.
Machine: LK 150 mid gauge machine
Tension: Carriage was set at the lowest possible tension (R) antenna was set at 1.
Gauge: 11.4 rows per inch, 5.7 stitches per inch but gauge isn’t really all that important unless you know exactly how big you want your little bag to be.
Machine Knit Technique: The bags were knitted and woven with the skein of yarn I bought from knitivity.com. I chose to weave it because I thought it needed to be thicker and I didn’t think I’d have enough yarn to double it for a heavy stockinette. Weaving takes very little yarn and I actually ended up with
2 ounces left after I made the 2 bags.

Picture above shows the woven side of the weaving
I did want the stockinette side to be the right side though so although I like the woven side, it will be hidden by a lining.
Stitch Pattern: Knit weave 2 rows, place a bead on every other stitch every 3rd row alternating the stitches where the beads will be placed. By always starting your beading from the carriage side of the work, you can start with stitch 4 each side stitch 2 and your beads will be alternated every 3rd row. Also because you have 44 stitches on the needle bed you can start weaving each side with a yarn over so you won’t get lost trying to figure out if you’re supposed to do a yarn over or a yarn under, its hard to tell when you’re using the same yarn for knitting and weaving.
Wind your yarn into a ball and then put it on an ounce scale. Wind half off into another ball. Knit the first side and switch balls for the second side.
I have a bead tool and the beads I wanted to use didn’t fit on it.
Thanks to zackDS@comcast.net for the following directions:
“I use Oral B Superfloss. Use the smooth stiff part like a needle and thread as many beads as needed for each row. Tie a knot below the fluffy part so the beads won’t fall off although the fluffy part usually holds them on.”
(NOTE: I tied the floss in a bow knot below the fluffy part so that the beads wouldn’t fall off the other end (just in case).
Directions:
With waste yarn cast on 44 stitches and knit a few rows, knit 1 row with ravel cord
Ewrap cast on over the ravel cord with your main yarn.
Knit one row over the cast on row (carriage on L)—we won’t count this row.
Row 1: Carriage on L, begin weaving starting with needle 1, over, needle 2 under--over and under, over and under (1x1 weave). ) you’ll end with a yarn under at the end of each row and start each row with a yarn over. Knit across, carriage ends on the R.
Row 2: Knit weave this row end with carriage on L.
Row 3: Load 20 beads onto your floss and begin on the carriage side (L) start with stitch 4 and put a bead on every other stitch ending with 2 empty stitches remaining on the R.
Weave your yarn across the bed and then knit across the row slowly. Don’t force the carriage.
Row 4 and 5, knitweave
Row 6: bead across starting with the 4th stitch on carriage side.
Continue weaving putting beads on alternate stitches as above on row 6, 9, 12, 15, 18, etc as above to row 51, continue weaving-only to row 55.
Finishing:
When finished, pin the 2 pieces out on a blocking board and steam to set stitches. Crab Stitch the 2 top sides of your purse before installing zipper. Hand baste the zipper into the 2 top pieces. Once it’s basted by hand, take to sewing machine and sew zipper in, be careful not to sew through your crab stitches.
Now measure and cut out your lining fabric in 1 piece, folded at the bottom.
Mattress stitch the 2 sides of your knitted purse together and turn inside out to sew bottom and weave your ends in. Insert the lining and hand stitch the top to the zipper facing, hiding your zipper stitches if you want. Don't you love how my lining happens to match the yarn? Its Laurel Burch fabric, I bought in a quilt kit when visiting in Tacoma, WA. Never will make the quilt I'm having too much fun with the fabric pieces.

Cell Phone Holder
Yarn Used, ½ ounce
Technique, knit weave on LK 150 as above
Cell phone bag isn’t lined because I made it snug so it would stretch a little wider to fit phone.
Cast on 16 stitches with waste yarn and ravel cord (as above)
Knit 1 row plan and start knit weaving and beading as above beading on row 3, 6, 9, 12, etc. Continue to row 108. Stop beading and knit weave 2 more rows. (end RC 110).
Pin your piece out on a blocking mat and steam to set stitches.
Fold piece over your cell phone and determine where you’ll want the bottom to fold. Sew up the sides using that measurement. Crab stitch around the entire top of the bag. Sew button on and crochet a chain buttonhole to fit button. (I found a mother-of-pearl button that looks so great with the beads).

BONUS BAG

DIRECTIONS
Cast on with waste yarn 16 stitches and knit a few rows. Knit 1 row with ravel cord.
With main yarn knit 1 row and then begin weaving as we did with the other 2 bags. Knit and weave 115 rows. Cut your weaving yarn and latch tool bind off with the main yarn. Crochet a crab stitch around the top.
Double the yarn and knit a 3 stitch ICord (knit 1 way, slip the other way). I’m sorry I didn’t count how many rows of ICord I knitted, I knitted until it was 30 inches long. I attached it to the 2 sides of the bag.
POCKET I decided to make a pocket for the ear buds because they are always in the bottom of my purse or pocket, all mixed up with pens, comb, etc and how handy is it to have them right there in the bag with the iPod.
With waste yarn cast on 12 stitches and knit a few rows. Knit 1 row with ravel cord.
With main yarn and weaving yarn, knit weave 11 rows as above.
ROW 12 start the diamond pattern with beads. Center 2 beads on the first row, 4 beads on the second row, 6 beads on the third row, 4 beads on the fourth row and 2 beads on the 5th row. Feel free to make your own bead pattern or omit it altogether.
ROW 17 continue knit weave to row 29.
Cut weaving yarn and latch tool bind off with main yarn.
Sew pocket to front of bag leaving the top open. If you wish, crochet a crab stitch across the top of the pocket. Steam the bag and you’re ready to walk.
By the way, I still have 1.1 ounce of yarn left over, enough for another little bag.
These bags won first place in a 1 skein contest that Ray at Knitivity.com was sponsoring. Maybe they won because they were the only entry but I like to believe they won because they came out so great and I made so many things with that one skein of yarn. What did I win? Why, another skein of yarn (different color). Maybe I'll post a picture and pattern of what I made with that skein some day...........
ps. apologize for the quality of the pictures, I had to scan them from the original pattern and they never come out as nice as if I'd taken a new picture.
Copyright © 2009, Rosalind Porter
Tuesday, February 1, 2011
Tatted Panels-Joining Afghan Panels
Joining Your G Carriage Afghan Panels With Needle Tatting
This article was featured in Machine Knitting News and Views November, 1995.
©Rosalind Porter, 1995-2011


Your basic afghan can be any design, to do one like mine you'd want one with 3 or 4 panels but you could use the edging pattern below and just edge a baby blanket or a neckline. I chose a garter carriage afghan that was divided into 5 panels. I also tatted around the edge of my afghan but that is an optional step. I love the way it looks though and the edging I've come up with is very easy and fast to do.
Abbreviations:
Ch Chain
Rw Reverse Work
R Ring
Cl Close
Ds Double Stitch
"-" Picot
"+" Join
Materials:
Needle Tatting Needle # 2-0 (smaller size Yarn needle)
Yarn: Your G Carriage Afghan Yarn
With right side of afghan facing you start at the top of first panel.
1. Chain 3ds + ( to afghan at 5th row down from top) 3 ds Cl Rw
2. R 3-3-3-3 Cl Rw
3. *Ch 3 + ( to afghan 5 rows from the last join) 3 ds Cl Rw.
4. R 3 + to first picot on last ring, 3-3-3 Rw
Repeat from * down the side of the afghan panel joining your work at the middle of each chain every 5th row ending with a chain. attached to the end to the afghan with a knot.
JOINING SECOND PANEL
To join the next panel, you will be tatting on the second panel and joining to the first panel at the 2nd rings picot as you go. Make absolutely sure you have both panels facing the right direction (top up). Also make sure you have the correct side facing on both panels so that your design is going in the same direction on both panels. With right side of second panel facing you
1. Ch 3 + to new panel 5 rows down from top 3 ds Rw.
2 R 3 - 3 + to second picot on first panel 3 - 3 Cl Rw.
3.* Ch 3 + to 5th row down from last join 3 Rw.
4. R 3 + to last picot on last ring, 3 + to second picot on first panel, 3 - 3 Rw
5. Repeat from * down the side of the afghan panel joining your work at the middle of each chain every 5th row. Make sure you end with the same thing (either a ring or a chain) on each panel.
NOTE: Check to be sure your afghan panels are lining up evenly as you go down. My afghan pattern consisted of a series of squares so I checked at the end of each square to be sure it was lining up. You could pin your panels together before you start and you can always skip to the 6th row down for a couple joins to even things up as you approach your checking point.
Optional Edging:
With right side facing attach to corner by bringing thread through from back.
**Ch 3 - 3 + to 5th stitch down the edge.
Attach to 5th stitch by bringing needle in from back to front, tie slip knot.
Repeat from * * All the way around the afghan skipping the rings at the middle of each panel if desired.
Here's a picture of the afghan, taken today (2/1/11)

You may copy and share this pattern but please keep the copyright intact.
This article was featured in Machine Knitting News and Views November, 1995.
©Rosalind Porter, 1995-2011


Your basic afghan can be any design, to do one like mine you'd want one with 3 or 4 panels but you could use the edging pattern below and just edge a baby blanket or a neckline. I chose a garter carriage afghan that was divided into 5 panels. I also tatted around the edge of my afghan but that is an optional step. I love the way it looks though and the edging I've come up with is very easy and fast to do.
Abbreviations:
Ch Chain
Rw Reverse Work
R Ring
Cl Close
Ds Double Stitch
"-" Picot
"+" Join
Materials:
Needle Tatting Needle # 2-0 (smaller size Yarn needle)
Yarn: Your G Carriage Afghan Yarn
With right side of afghan facing you start at the top of first panel.
1. Chain 3ds + ( to afghan at 5th row down from top) 3 ds Cl Rw
2. R 3-3-3-3 Cl Rw
3. *Ch 3 + ( to afghan 5 rows from the last join) 3 ds Cl Rw.
4. R 3 + to first picot on last ring, 3-3-3 Rw
Repeat from * down the side of the afghan panel joining your work at the middle of each chain every 5th row ending with a chain. attached to the end to the afghan with a knot.
JOINING SECOND PANEL
To join the next panel, you will be tatting on the second panel and joining to the first panel at the 2nd rings picot as you go. Make absolutely sure you have both panels facing the right direction (top up). Also make sure you have the correct side facing on both panels so that your design is going in the same direction on both panels. With right side of second panel facing you
1. Ch 3 + to new panel 5 rows down from top 3 ds Rw.
2 R 3 - 3 + to second picot on first panel 3 - 3 Cl Rw.
3.* Ch 3 + to 5th row down from last join 3 Rw.
4. R 3 + to last picot on last ring, 3 + to second picot on first panel, 3 - 3 Rw
5. Repeat from * down the side of the afghan panel joining your work at the middle of each chain every 5th row. Make sure you end with the same thing (either a ring or a chain) on each panel.
NOTE: Check to be sure your afghan panels are lining up evenly as you go down. My afghan pattern consisted of a series of squares so I checked at the end of each square to be sure it was lining up. You could pin your panels together before you start and you can always skip to the 6th row down for a couple joins to even things up as you approach your checking point.
Optional Edging:
With right side facing attach to corner by bringing thread through from back.
**Ch 3 - 3 + to 5th stitch down the edge.
Attach to 5th stitch by bringing needle in from back to front, tie slip knot.
Repeat from * * All the way around the afghan skipping the rings at the middle of each panel if desired.
Here's a picture of the afghan, taken today (2/1/11)

You may copy and share this pattern but please keep the copyright intact.
Sunday, January 30, 2011
Michigan Machine Knitting Seminars
Since the topic has been mentioned this past week on the knittingmachines Yahoo Group I thought I'd add the upcoming seminars/workshops coming up in Michigan.; Its time to plan for them now.
BTW, this information came from Sandee Cherry's web site http://sandeeskwikknit.com/seminar.html. Sandee will be teaching at the Monroe seminar in July. If you can attend do, her patterns are quick and easy and spot on for up-to-date-fashions. While I'm at it I added Peru, IN...Charlene Shafer always has a fun seminar, its inexpensive and people leave with a carload of yarn(ask me how I know)
March 25-26, 2011 Monroe, MI USA DAK Hands-on Workshop
for more info call Cathy Reaume (734)243-3016
April 1-2, 2011 Grand Rapids, MI USA Grand Rapids Area Machine Knitters
for more info call Sara Coates 616-887-0675
April 15-16, 2011 Peru, IN USA Spring Fling Knit Knack Shop
for more info call Charlene Shafer 765-985-3164
**July 22-23, 2011 Monroe, MI USA 23rd Monroe Seminar
for more info call Cathy Reaume(734)243-3016
I am planning on attending the Grand Rapids seminar and possibly the Monroe seminar, depending on other obligations. There's nothing like a seminar to learn more about your machines and to have a great time with other like-minded people.
I hope to see all you Michigan and surrounding state machine knitters at one of these seminars, I promise you'll have a fabulous time.
BTW, this information came from Sandee Cherry's web site http://sandeeskwikknit.com/seminar.html. Sandee will be teaching at the Monroe seminar in July. If you can attend do, her patterns are quick and easy and spot on for up-to-date-fashions. While I'm at it I added Peru, IN...Charlene Shafer always has a fun seminar, its inexpensive and people leave with a carload of yarn(ask me how I know)
March 25-26, 2011 Monroe, MI USA DAK Hands-on Workshop
for more info call Cathy Reaume (734)243-3016
April 1-2, 2011 Grand Rapids, MI USA Grand Rapids Area Machine Knitters
for more info call Sara Coates 616-887-0675
April 15-16, 2011 Peru, IN USA Spring Fling Knit Knack Shop
for more info call Charlene Shafer 765-985-3164
**July 22-23, 2011 Monroe, MI USA 23rd Monroe Seminar
for more info call Cathy Reaume(734)243-3016
I am planning on attending the Grand Rapids seminar and possibly the Monroe seminar, depending on other obligations. There's nothing like a seminar to learn more about your machines and to have a great time with other like-minded people.
I hope to see all you Michigan and surrounding state machine knitters at one of these seminars, I promise you'll have a fabulous time.
Friday, January 14, 2011
Chicken Pot Pie

This recipe came from the Pillsbury.com/calendar2011. Its the January recipe and I knew as soon as I saw it I was going to make it.
INGREDIENTS:
Crust: 1 box Pillsbury refrigerated pie crusts softened as directed on pkg. (I did mine in the Microwave for a second or two...don't go too long (ask me how I know)
Filling:
1/3 cup butter or margarine
1/3 cup chopped onion
1/3 cup all-purpose flour
1/2 teaspoon salt
1/4 teaspoon pepper
1 can (14 oz) chicken broth
1/2cup milk
2 1/2 cups shredded turkey (I used chicken, hence the change in title)
2 cups Green Giant Valley Fresh Steamers frozen mixed vegetables, thawed.
Directions:
1. Heat oven to 425 F Make pie crusts as directed on box for two-crust pie using 9 inch glass plate.
2. In 2-quart saucepan melt butter over medium heat. Add onion, cook 2 min stirring frequently until
tender. Stir in flour, salt and pepper until well blended. Gradually stir in broth and milk, cooking and
stirring until bubbly and thickened.
3. Stir in turkey or chicken and mixed vegetables. Remove from heat. Spoon into crust lined pie plate.
Top with second crust, seal edge and flute. Cut slits in several places in top crust.
4. Bake 30 to 40 min or unti crust is golden brown. During last 15 to 20 min of baking cover edge of crust
with strips of foil to prevent excessive browning. Here's my pie ready for the oven

Very yummy, as you can see 2 of us did a good job of eating it although I did take out a slice for my friend for his freezer. It will make a nice lunch in a few days.
NOTES:
OK, I didn't have any leftover poultry so I used 2 boneless, skinless chicken breasts, thawed almost totally and then chopped into about 1 inch pieces. I used Pam in my frying pan and cooked the pieces until all pink was gone. I salted and peppered them as they were cooking and also sprinkled in some McCormick Chicken Seasoning (it has a little bite, makes it sooooo good) and some poultry seasoning. Put it in the fridge until I needed it, there were some nice juices in the bottom of the plastic tub I had them stored in and I added that to the chicken broth in number 2 above. I also sprinkled just a little poultry seasoning on the crust.
Next time I'm thinking I'll use Cream of Chicken Soup for the liquid it has a nice flavor and I can add the liquid from my cooked chicken to make it a little more juicy.
I hope you try it and ENJOY!
The crust comes out really nice and flakey. It really was a delicious dinner and we're eating the leftovers tonight :-) That's making a couple chicken breasts go a long way, don't you think?
Subscribe to:
Posts (Atom)