Monday, July 25, 2011

Making Buttons for your Knits

Slice up your own dried tree branches. If you take a branch off the tree, let it dry before you make buttons. Here in South Carolina, I find them in my woody backyard. They are as easy to slice as a piece of lunch meat.
 
You can actually slice up a whole branch in no time and they don't all have to be the same width or length, as you can see, some of mine have little knots on the side which I love.
My DH liked the ones with no bark but I loved the ones with bark so we did both.
After you slice them drill 2 or 4 small holes and lightly sand.
Soak them overnight in a (clean) margarine tub filled with satin polyurethane or shiny polyurethane (makes 2 very different looks). I like to leave the pins in the holes so they won't get filled with polyurethane.
 
Next sand both sides lightly again.
Once sanded pin them to a box, a pizza delivery box with sides intact is perfect, then go outside and spray the side facing with satin or shiny poly and let them sit outside overnight. I purchased some steel straight pins (you remember, the kind we learned to sew with? Because you'll be spraying the pins as well as the buttons, the pins are pretty much ready to throw away after you're finished with them. Don't worry a box of pins are inexpensive compared to the price of hand made wooden buttons. I left them in the house to dry since I live in a humid climate winter and summer.
Next day turn them and spray them again. Another light sand, another spray , let dry, spray other side, let dry and they're done. So you've sanded them 3 times and sprayed them twice.
After the first test one was done I sewed one to a swatch and machine washed and dried it 5 times that day while I was doing laundry. The test one came out just like new so I knew we had a winner. I've had my wooden buttons on a best loved cardigan ever since we made the first button back in the 80's. The buttons look good as new although the sweater could use a replacement. I always take them off the garment when I toss it so I have never run out of buttons.
 
When you sew them on, don't necessarily look at the dimension, try it in your buttonhole, it depends on width as well as thickness and the little knots on the sides, whether or not it will go through the hole so your sweater may have 5 different size buttons.
BTW, after you have finished spraying them with the poly, you can get some acrylic paint and a small paint brush and paint flowers or toys or whatever you want on them, spray that after its dry and you have a button that will match any theme and they look very different from the plain ones.
The picture above is just one of my buttons.  We tried several different kinds of tree limbs and each one looked different.  I think it was ash that gave us a larger lighter color.  We also used maple and cedar.  Cedar were my favorites.

Try a branch, I'll bet you love them.

Monday, July 11, 2011

New Garden Flag

Its been a while since I've sewn anything but I decided I needed to make a garden flag for the next Holiday, Labor Day.  I checked my files for the Tweets (birds in a tree doing Holiday things) from Embroidery Library.com but there wasn't a Labor Day Tweet.  Oh well, I found one called "What I'll Be When I Grow Up" and thought, perfect, it shows workers, a fireman, astronaut, pop singer, cowboy...and I added Biscuit at the bottom, wearing a fireman's hat.  Well, when I got it finished I liked it so much I didn't want to wait till Labor Day week to put it out so I put Happy Day at  at the top  instead of Happy Labor Day and put it out.
I made this one a little different from the others I've done.  I like the sterling chain at the bottom to hold the flag down in the wind so made a little casing at the bottom.   I did a rolled hem on the sides instead of sewing a doubled hem and I like how it looks.   I made the top casing wider so that I didn't have trouble threading it onto the flag holder which is a royal pain.   Then I tried to iron a fusible stabilizer to the back because the flag fabric is fairly thin and really needs more than the medium weight tearaway I have always used.  Also I didn't like the idea of a wash-away stabilizer because I didn't want to have to soak it when it was done but next time I hope I remember, the fusible stabilizer doesn't fuse to the flag fabric well.  You can't use a lot of heat on these things because hot heat will melt the fabric so I couldn't get it hot enough to fuse.  Doggone it.  I ended up leaving it half-way fused and hooped the tearaway, sprayed the fusible with sticky stuff to hold it to the hooped tearaway.  When I got done I had to cut the fusible out around the design in the back.  Pain in the neck but it looks ok so that's all that matters.  
The casing that holds the chain is a good idea, it holds down better than the chain I put on the last one (which I just tacked on when the flag was done).   So in all, I like this flag, every one I make teaches me something new.    The additional stabilizer was a good idea, maybe next time I'll use Badgemaster which is a washaway and I'll soak it when finished.  Obviously its the easiest way to go.
BTW, the flag looks a little wacky, the wind was blowing just a bit when I took the picture, hence the crooked sides.  Really, its straight.

Next project---I'm making another pair of socks once again trying the Interweave sock book called Favorite Socks, I'm learning with this project too, it calls for 5 double pointed needles, 4 in the circle and 1 to knit with.  I'm making Retro Ribbed Socks, one of the first in the book.   I had a heck of a time casting on with 4 needles but did manage to get started last night while I watched Housewives of New Jersey. Since its raining and humid out today I may just sit under the ceiling fan and knit all day.  This project requires a little concentration until I memorize the pattern.

Monday, June 20, 2011

EZs Surprise Baby Jacket

Note:  This sweater and blog post was done in Sept 08.  I knitted it for a contest my MK guild was sponsoring at the time, we were all supposed to make a BJS.  Only a few of us did it but it was a challenge I was pretty proud of.    I came across the pictures the other day, not sure why I didn't put them up when I knitted the sweater but anyway, here they are now, June 2011.

Well, I finally sat down and knitted this sweater and it took me as long to figure out what went where as it did to knit it. I decided to just knit per the pattern as written (http://www.junebugsplace.com/) and disregard my tension swatch because I just wasn't sure what went where. I striped it randomly just to see where the strips would go and they sure didn't turn out where I thought they would
I also couldn't figure out where to put cables and honestly, after looking at my finished product, I still don't know where to put cables so that they end up as hearts. OH well! I've now decided that with all the ends left with the stripes, I'm going to make a plain blue sweater and trim it with the other 2 colors somehow (to be determined when done).

Now that I've got this made with all the different stripe patterns I can at least figure out where I did what. The back turns out to be the biggest piece you knit between the shortrows. The shortrows become the sleeve backs at the cuffs and bottom front of the sweater. Its easy to figure out where the center front neck is, you have decreases there and they HAVE to be the front neck. When you look at my pictures, remember, I have packed my pins and so rather than pin it out, I threaded knitting needles through the edges so that I could see what I was doing and hopefully you can too. The green bit, by the way, is the beginning waste yarn. I ewrap cast on over it. (& that's the beginning of my knitting).

Here's the piece as it comes off the machine, the bottom is where I cast on


.


here's the back. As you can see, its the center section between the short rows.


Front, & yes, my stripes don't match up because I didn't try to make them match, I had no idea what part I was knitting when I made them. But I'm glad I did that because now I know, the right front is the beginning edge I knitted and the left front is the ending part. The short rows are at the front sides and theback sleeves at the cuff sections. Wierd? How in the world did EZ figure this out.??

Saturday, May 28, 2011

Memorial Day

Memorial Day, originally called Decoration Day, is a day of remembrance for those who have died in our nation's service. There are many stories as to its actual beginnings, with over two dozen cities and towns laying claim to being the birthplace of Memorial Day. There is also evidence that organized women's groups in the South were decorating graves before the end of the Civil War: a hymn published in 1867, "Kneel Where Our Loves are Sleeping" by Nella L. Sweet carried the dedication "To The Ladies of the South who are Decorating the Graves of the Confederate Dead" (Source: Duke University's Historic American Sheet Music, 1850-1920). While Waterloo N.Y. was officially declared the birthplace of Memorial Day by President Lyndon Johnson in May 1966, it's difficult to prove conclusively the origins of the day. It is more likely that it had many separate beginnings; each of those towns and every planned or spontaneous gathering of people to honor the war dead in the 1860's tapped into the general human need to honor our dead, each contributed honorably to the growing movement that culminated in Gen Logan giving his official proclamation in 1868. It is not important who was the very first, what is important is that Memorial Day was established. Memorial Day is not about division. It is about reconciliation; it is about coming together to honor those who gave their all.   (copied from Wikipedia)

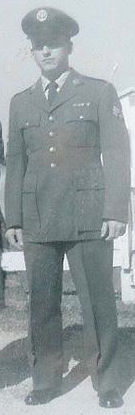
When I was growing up I remember my dad always had a big flower garden in the field next door to us.  He would pick big bouquets and we'd all go to the cemetery to put flowers on my grandparents graves.   We didn't give a lot of thought to the Military who died because honestly, we didn't have any that I know of that gave their lives while in Service.   My dad was around 18 yrs old when he was a soldier in WWI but I have no idea and don't remember him ever talking about it.  All I have is a very old picture of him in his uniform taken someplace in the U.S.

Meanwhile, my husband was a 21 yr veteran of the USAF. He loved the Air Force and believe it or not, in spite of all the moving we did, I loved it too.  He passed away in 2007 and was buried in a brand new VA cemetery in Anderson,SC.   Nowadays, naturally, I do think of the Veterans and those who gave their lives for us.  My husband didn't but he could easily have since he went in the AF before the official end of the Korean War and served during the Vietnam war.  Lucky for our family, during the Vietnam War time,  he was sent to Biloxi, Mississippi to teach those who were going to Vietnam and managed to stay in the States during the entire war.  Still, he always felt guilty for not going even though I always felt like someone had to train the young  troops here in the States and maybe he was one of those who kept them safe while there.  

This weekend I hope everyone takes a few moments from the big Department Store Sales, the picnics, the beach, and just say a little prayer for the people who are serving and those who lost their liveswhile serving  in the Military and lets not forget the people who are suffering from the terrible weather we've had the past couple weeks.

Howard Porter, taken just before being shipped overseas in 1960
Veterans Cemetery; Anderson, SC where my husband rests
Tornado picture courtesy of Wikipedia

Tuesday, April 19, 2011

New Guest Room and Wall Hanging

I finished my guest room (which WAS my knitting room) and a wall hanging to hang in it, just in time for a visit from my daughter who lives in Tacoma.  Yaaay!   Got the wall hanging done just before I went to airport to pick her up. Here's a picture of the hanging
The room turned out nice I thought.  I went to the local Comfort Center and bought a futon and the guy threw in a "better" mattress for it than the cheapie that was on it.   I love it.   Naturally, the color meant I needed to sew the wall hanging onto a red background.   Here's the finished room with the hanging  and a second picture to show a little more of the room.  The lady who lived here before me had a carpenter husband and grandson and apparently they built the nice inset with shelves beside the window.  Its perfect for some of my knickknacks, which include a couple of the bunnies that prompted me to knit the bunny that I posted the pattern for in my last post.  Lucky enough, one of the bunnies is wearing a red plaid dress so she goes with the room :-)

I can still put my knitting machine back in that room, its legs are on sliders so its easy to slide to different rooms, it is presently in MY bedroom but I don't like it there because I tend to put clothes and "things" on it and even though its covered, that's not a good practice.   Besides, my bedroom isn't as bright as this room and I don't have a lot of company so its a better place all around for my knitting machine.

I learned a lot with the wall hanging, mostly about stabilizers, I used some of my fabric stash because I had a lot of the blue cotton that I sewed the squares on. The cotton was fairly thin and I used a medium tearaway on it but should have either used 2 layers of the tearaway or better yet, a fusible.  Reason:  The pattern shifted on a couple of the squares.  Actually, one of the squares came out larger than the others and didn't quite fit...naturally it was a center square so I had to do a lot of fudging.  If I had more fabric I would have done that square over but already had to do 2 over again so ran out of fabric.   Lesson learned!    But in the end it turned out ok and I like where its living although originally I was going to hang it out on my front porch.   NO WAY!  It has to live in the guest/knitting room.

Monday, April 4, 2011

Easter Bunnies

Yes, its time to knit for Easter and what's Easter without a couple bunnies on your shelf?

These bunnies were not my original creation (so to speak) I received a couple made out of fabric by one of my school buddies. Hers had dresses that are like bean bags.  I decided they would be fun to knit.   The one with the red plaid dress was made by a Compuserve member back when I wrote the original pattern. (does that tell you how long ago this pattern was written?)

Bunny Pattern
Materials: MC--any color for dress
CC--any desired for dress trim
Baby pink for bunny head, hands and feet
Use any yarn that is similar to Trenzi, Trenzado or Solo
Small amount of polyester stuffing
Machine: Any standard gauge.
Tension: Tension 6 on any Brother or Knitking standard  machine. This should be knitted tight
Dress: C/O 90 sts with waste yarn and knit a few rows. K 1 row ravel cord.
RC000: With MC knit 36 rows. Weigh well. *Pull every 5th stitch to holding position.
Carriage on hold, with CC work 4 rows. Break CC. Turn carriage off Hold.
With MC K 1 row.*
Repeat from * to * 1 time.
If desired, pick out any small fairisle pattern and place here. (tiny flowers look good).
Knit to row 80. Take off on waste yarn.

Head: Rehang on 60 needles, wrong side facing thus: 1 st, 2 sts, 1 st, 2 sts, across.
Now rehang the cast on edge as above, 1 st, 2 sts, 1 st, etc as above.
RC 000. With pink K 30 rows. Transfer every other stitch to needle on right. Leave empty needles out of work. K 1 row. Cut thread 3 X the width of work. (use this to take off with double eye needle). Gather top of head and sew seam with the mattress stitch. Stuff head tightly and run thread through neck to gather neck closed.

Ears: Make 1: C/O 14 sts with waste and work a few rows. Work 1 row with ravel cord.
With pink K 80 rows. Break thread about 1 1/2 x the width of work and take sts off on double eyed needle. Gather just the end and secure and cut thread. Take open cast on sts off on beginning thread, gather, secure and cut. Tie a knot in the middle of ear fabric and sew the knot to the top of the head. Embroider mouth and eyes.

Arms: Make 1. C/O 14 sts in waste yarn and K 1 row with Ravel Cord as above. RC 000 Knit 90 rows. Take off as you did ears. Tie knot in the middle and secure each end to the side--more to the back than front. About half-way between neck and bottom of skirt so the knot sits in the middle front, not loosely, not tightly, knot is the hands.

Legs: Make 2. C/O 14 sts with waste and ravel cord as above. K 50 rows. Take off as above but sew seam for about 1". Stuff lightly for foot and gather at ankle (at top of 1" seam). Tie knot between ankle and top, closer to top (knees). Gather up open sts at cast-on and secure under dress in front. Sit bunny on the edge of a shelf or chair with her legs hanging down.

Variation #1:

You can put a tuft of orange yarn up through the knot in her hands and she'll look like she is eating a carrot (variation thanks to a Prodigy member).

Variation #2:

When making the ears, arms and legs, rather than casting on with scrap and ravel cord, use the pink yarn and the Weaving cast on. Then when you want to gather the ends, just pull the weaving thread and it is all gathered! (variation thanks to a Compuserve member).

Variation #3

Here's a DAK enhancement by a new Compuserve membere:" I've made 3 bunnies and using Dak I put (what else?) bunnies on the dress. After reading a discussion of using the lace carriage to transfer stitches for reducing , I did the reductions for the bunny with the lace carriage. I just added a few extra lines to the Dak pattern for the needle selection for the lace carriage. (I was knitting from screen-color pattern only, and I turned it off for the plain parts and turned it on for the tuck, the fairisle, and (now) the transfer of stitches). On
Bunny #3, I started the tuck pattern at R 32, hung the hem at R 72 (this was much faster for me than hanging it when you rehang after the decreasing), transferred stitches for the decrease at R 76. Then put the empty needles out of work, and threaded a separate piece of doubled yarn over and under the pairs of needles left in work. With the weaving brushes engaged, k one row. This installs the drawstring to gather the neck. Then scrap off and rehang the live stitches on 60 needles, knit the pink for 30 rows for the head, then transfer every other stitch, knit 1 row, take off and gather. "


Sunday, March 20, 2011

Stained Glass Embroidery

I've been working on and off on this stained glass embroidered wall hanging since the day I first bought them (I think the first day they came out. You can see the whole set at http://www.emblibrary.com/EL/new.aspx?date=030911 .     I plan on getting a piece of upholstery fabric for the backing. Emblibrary has excellent directions for making this, I have them all printed out and following them to the "T".   I am making some of the colors different than theirs but then that's the fun of machine embroidery.

These are pretty and its fun to put the pieces together and see them match up. I haven't ever done anything like this before. As you can see, so far I have the first row completed.  I finished the center piece of the second row last night  but my embroidery machine messed up just a little when the bobbin thread decided it didn't want to work and the whole design shifted just a little.  I can fix it and will before I start the adjoining pieces. Phooey, I know better, the machine doesn't like it when I leave it even just long enough to put the dog out and get a drink of water. That's what I get, the machine needs me.    :-)