My formula will work no matter what style you are making. This isn't actually MY formula, it came from Pat Wetzel and it was so perfect I never forgot it......
1. You are making a sweater. You measure 31" from middle of back to end of cuff on a long sleeve sweater.
2. You personally measure 7 inches from middle of back to edge of shoulder and arm is 24 inches from that same edge of shoulder to cuff. (total 31)
3. You make a drop shoulder sweater that is 10 inches wide, middle of back to shoulder. (that's 3" wider than your shoulder)
4. You subtract 10 from your total of 31 (total length you need from middle of back) You would make your sleeve 21 inches. (in spite of the fact that your arm measures 24")
Does that make sense?EXAMPLES:Let's say you are making a short sleeve drop shoulder sweater.
You measure 7" from middle of back to shoulder.
You want the short sleeve to come down 7" from that same point at the shoulder.
Your sweater measure 10" from middle of back to edge.
If you make a 7" sleeve and put it on a 10" body, you'll be going down 17 inches which is too long.......your total length from middle of back to 7" down to where you want the sleeve to end is only 14" so you make the body which is 10" subtract 7 from 10, you need to make the sleeve 4" long.
If you make a set in sleeve: You measure 15" shoulder to shoulder ---or 7" middle of back to edge.
You want a long sleeve and measure 31" total (middle of back to bottom of arm).
Since your sweater body is made to fit 15"--it will measure 7" from middle to edge.
Now you need a longer sleeve--so make it 7 minus 31 or 24"
If you make a modified drop shoulder and it's 10" wide but you took off 2" at each edge for the modified drop.
You now have 8" middle of back to edge Make the sleeve 31" minus 8" or 23" It works!!!
Copyright, 1999-2008 Rosalind Porter Piney Mountain Cottage
The information, patterns and images contained on this page are for personal use and may not be altered, converted nor uploaded to any electronic system or BBS nor included in any compact disk (CD-ROM) or collection of any type without the express written permission of Rosalind Porter.

ROZ'S LOFT: Join me as I try new techniques and learn more about my machine and hand knitting hobby as well as living a new life in northern lower Michigan. Always an adventure!
Saturday, January 19, 2008
Thursday, January 17, 2008
HOW TO CALCULATE YOUR OWN PERSONAL SOCKS
Print this page out, you can use it as a worksheet and as your pattern.
Figuring your own sock pattern is so liberating. Now you can look at a pair of socks in a store or magazine and knit your own, using a worksheet! YIPEE!
ADULT SOCK
PART 1: Measuring
NOTE if you are knitting a knee length sock you need to decrease evenly so that the sock will fit up on the calf as well as around the ankle. If you are knitting a regular crew or ankle length sock you won't need to figure decreases, just measure your ankle and cast on accordingly. If you are knitting a fairisle pattern, don't forget to turn it upside down.
Get out your paper and pencil and calculator:
1. Make a swatch and measure for stitches (spi) and rows (rpi) per inch
spi=_______rpi =_______
2. Measure width of ankle _________inches x spi = ______
3. Measure width of top of sock (where you want sock to end) _________inches x spi =______
4. Figure out how many inches you want the top rib or hem to be ____inches
5. Measure length of top of sock to ankle in inches less desired hem _____inches x rpi =_____
6. Measure length of foot on bottom of foot, subtract 4" for heel and toe _____inches x rpi _____
PART 2: KNITTING YOUR SOCK
RC 00 Cast on __________STS (# 3 above) Knit or rib your hem
For Knee Length socks, figure your decreases now. Formula is:
a: # 3 minus # 2. (#3 spi - #2 spi) = _______.
b: Figure Rows per inch x # 5 above = _______.
c: Divide b by a ____ = decrease rows i.e. if your answer is 4, you decrease each side every 4 rows until you are down to desired ankle stitches ( # 2 above).
Sometimes it's going to be necessary to refigure this, for instance, I needed to decrease 45 stitches in 63 rows for a short/fitted sock. According to the formula, I should decrease 2 stitches every 3 rows but when I finished I had only decreased 42 stitches, I needed to add a couple "every other rows" in that decrease formula to make it come out).
RC 00 Knit in desired pattern to RC _________ (# 5 above)--following decreases as above if necessary
RC 00 Short row for heel: You want to short row 2" for an adult heel, # 1 rpi x 2= ____________rows to shortrow
i.e. if you have 7 stitches per inch, you would shortrow 14 rows down and 14 rows back up as follows:
Carriage on right push in hold buttons. Pull all needles left of 0 to Hold position. Pull 1 needle next to carriage to hold position and knit acrossContinue pulling 1 needle next to carriage to hold position for 14 rows (or # of rows to = 2 inches).
Reverse shortrow by pushing 1 needle opposite carriage back into work, wrap 1st stitch on carriage side and knit across.
Continue pushing 1 needle opposite carriage back into work and wraping the 1st stich on carriage side until all needles are back in work.
RC 00 Knit ___________ rows (#6 above)
Short row toe same as heel (2") __________rows.
NOTE: If you want the seam to end on top of the toe, shortrow toe on same side you did the heel. If you want the seam under the toe, shortrow the toe on the opposite side of the heel. i.e. you shortrowed the heel on the right. Shortrow the toe on the right for seam on top or knit 1 extra row so that carriage will be on opposite side so toe will be shortrowed on opposite side of sock.
Knit 1 row across all stitches. Divide stitches in half and take each side off separately on ravel cord and waste yarn, fold in half and kitchener stitch seam.
NOTE: If you want to fold your ribbing down, be sure to mattress stitch on the wrong side half way down the ribbing, then turn to the right side and finish the seam.
ps....see note about decreasing above. The worksheet figures straight line decreases
Make yourself a spread sheet file or get a notebook to help you chart socks. Included my worksheet below to show you how I did mine
Width of ankle in inches 9
w of top in inches 15
L of top to ankle in inches 9
L heel to toe in inches 6
PART 2, KNITTING
RC 0 cast on 105 stitches
Knit to RC 90
Desired sts at ankle 63 sts
Dec 42 sts or 21 each side to 63 sts then continue knitting to RC 90
Dec formula
dec every 4 rows to R 90
Short Row Heel
14 rows of shortrowing
Reverse short row back until all stitches are back in work
Work to toe 60 rows
Short roe toe as heel
Reverse short row back as for heel
Knit 1 row across
Divide the work in half and take each side off on waste separately
Fold in half and Kitchener toe, mattress stitch seam
side seam
Make second sock exactly same only complete shortrowing on opposite side so
seam will be on the inside
I hope this page will help you figure your own socks Roz Porter, Piney Mountain Cottage
This page is my little invention with some help from friends. Feel free to use it and even pass it along to your friends if you wish but be sure to mention where you got it. Thank you!
Tuesday, January 15, 2008
Working with the Brother 970 Garment Creation
People have told me that they absolutely love the 970 Stitchleader (Knitking's Compuknit 5 Star) but that they have problems putting their garment shapes into it and others know how to get the shape in but have a problem knitting it from the little screen. Knitting with this machine should be a dream. This machine has it all, the patterning, the shapes, everything but a built-in robot to push the carriage.
I've been thinking, if we put in a standard drop shoulder sweater, all we'd have to do is make a few changes when we want to change the shape, make a tension swatch and start knitting. So, once you get your basic drop shoulder garment into your machine, you can save it if you have a floppy disk drive. Unfortunately, DesignaKnit is not equipped to save garment shapes and I don't know if it ever will be. If you have a blank cartridge, you can fill up the machine's memory and then save to the blank cartridge. Don't save to it until your machine is full because it will erase everything on the cartridge when it saves.
Once the personal basic drop shoulder sweater is in the machine it should be an easy matter to change the garment into a tunic, a V-neck, etc. All you have to do is go back to the garment front and back and using the Garment Alteration Icon add some length from underarm to hem on the front and back or change the neckline to a new one. You can change it into a cardigan going into Garment Creation and make a new front that is non-symmetrical and use the original back and sleeve. I can see lots of possibilities with having a standard shape that fits me in the machine, ready and waiting. Just be sure to keep a notebook of what you've done each time you've changed the garment so that you can always go back.
I came up with a fairly standard 40 inch drop shoulder pullover that is easy to input and knit but it does include some shaping. If you are having problems with the garment shaping options of the machine, try this simple little pullover. If you are having problems with the actual knit from screen directions, go ahead and put the garment shape in and pretend to knit it along with me. You can always delete the whole thing later and put in your own personal garment. It's possible to input a garment measurement into the machine in inches however metric is so much more accurate, it's better if you use centimeters.
Even so, I am so used to inches, my poor mind sees in inches....so I chart in inches and once I'm done, I convert to centimeters. I bought a calculator at Radio Shack called a Pocket Handyman. It converts from inches into centimeters for me. Simply put in the inch amount, push "inch", push "=" push "centimeters"....you've got your metric conversion!
In my schematic, I have not included measurements for ribbings. There is no need to input ribbing allowances on the machine in my opinion. I always suggest that whenever you put a garment into your machine, you FIRST draw it out on paper, make a note of your measurements and the number that the machine assigned that particular garment. Also be sure to note the Stage Numbers that you will be inputting. It's easy to get distracted when you are putting something into the machine; this will help remind you when you get back to it if that happens.
To start, here's what I'd like you to do. Go ahead and input the measurements as I've given them. Later you can delete the garment from your machine and put in your own garment but this is a practice exercise so let's practice and learn. We'll input the garment, put in a gauge and pretend to knit. For our exercise, these are the icons we'll be using:
(not shown, X =Width, Y – Length)
Bottom L to R: Step Key Stage Number, Knitting Icon, Garment Alteration
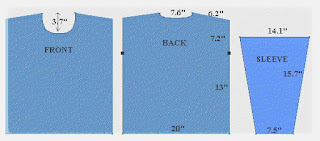
FRONT: S5 Y = 9.3 cm (3.7 in)
SLEEVE: S1 X = 9.5 cm
BACK: S1 X = 25.4, cm S1 Y - 42.4 cm, S2 X = 33 cm S2, Y = 42.4 cm, S3 X = 18.3 cm S2 X = 8.9 cm, S4 X = 15.7 cm, S3 X = 18.4 cm, S4 Y = 2.7 cm, S5 X = 9.7 cm, X5 Y = 1.2 cm
Let's input our sweater front. Turn on your machine and with the DIRECTION key arrow over to the DESIGNING PROGRAM icon. Press STEP.
Now select the GARMENT CREATION icon. Press the STEP key.
Number 1 will show on your screen along with 2 shapes, a symmetrical shape and a non-symmetrical shape.
The number 1 is your garment number, record it now.
Since this is a pullover, both sides are exactly alike from right to left therefore this is a symmetrical shape. Because it's a symmetrical shape, the machine knows it can mirror image and you only have to put half the garment in, starting at the center lowest point. Choose this shape then press the STEP key.
S1 appears on the screen to notify you that you are about to input the Stage 1 number. The Stages are the various shaping lines you'll need to enter for each separate part of the garment, they are shown at the top left of your CB-1 controller. Push the STEP key.
We will be putting in 1/2 of our garment, starting with the center bottom and going counterclockwise so shape 1 will be the #1 figure shown at the top of your CB-1 controller. It's 1/2 the bottom width of your sweater. Push the Number 1 key and then push STEP l.
Press STEP again.
X=? We have to tell the machine how wide our garment will be. Refer to our schematic. Our garment is 50.8 cm wide. Put in the number 25.4 (starting from center bottom, 1/2 of our 50.8 cm). If you accidentally put in the wrong number simply push C and then continue with the correct number. Push the STEP key.
S2 appears. Push STEP. Line #2 represents our vertical rows up the pullover. Select #2 as your shape line and press STEP. Press STEP again.
Y is your vertical measurement. Your length to underarm is 33.0 cm. (we could go on up to our shoulder line for this but we want the machine to remind us to put in an underarm marker). Input 33.0 and press STEP. S3 appears. Press STEP.
Put in Line #2 again (your vertical line from underarm to shoulder). Press STEP.
Y=? Again you need to put in the vertical measurement. Your underarm to shoulder is 18.3 cm, punch in that number and press STEP.
S4 appears. Press STEP.
Line 4 is our shoulder. We have a 1" slant to our shoulder, slanting up to the neck. Push line #3 for this stage. Press STEP.
Press STEP again.
X=? This is our horizontal measurement. That measurement is 15.7 cm. Input 15.7. Press STEP.
Y=? The length of our slant is 2.7 cm. Input 2.7 and press STEP.
Stage 5 is our last shape. Push STEP.
We'll use the curve #10 for this. Push 10 and then push STEP.
The first Icon which is slanted down to the left should be blinking, push STEP.
Your X measurement (horizontal) is 9.7 cm Punch 9.7 into the machine and press STEP.
Your Y measurement (vertical) is 9.3 cm. Punch 9.3 into the machine and press STEP.
We came to END. This means we didn't make a mistake with our measurements and we are now ready to knit. Make sure to push the STEP key to finish your creation. Then the main menu appears on the display.
If you had measured just a little off at this point, you could put in a straight horizontal line to make the neckline go to the middle. The secret here is to put in a large line...(10 cm). The machine will come back and tell you that you can only put in a short line and it will give you the measurement you need. If you need to go back to a previous stage, you can do that but only when you are at a place where the machine says "STAGE #" At that point, just arrow back where you need to be.
KNITTING OUR GARMENT: To continue on with our exercise, let's pretend we are knitting our garment. If you already know how to machine knit but haven't knit from screen before, this will be a little different for you. You need to learn to watch your display window and follow the "needles in work" numbers.
Let's also take a minute to review shortrowing procedures:
1. It’s easiest to shortrow the needles opposite the carriage, K across then when the carriage is on the shortrow side, wrap the last needle in hold (next to the last working stitch). Knit 2 rows and repeat. To do this, check the "needles in work" numbers in the display when your carriage is opposite the part you want to shortrow . The numbers in the display are the needles in work numbers.
2. When you have more than 2 rows between a shortrow (i.e. the pattern says, decrease 3 stitches every 3rd row) it's time to stop shortrowing and manually decrease the stitch ~ placing it on the working needle next to it.
Now we can knit our garment.
I chose a standard gauge of 7 sts and 10 rows for our sample. Or 40 sts = 14.5, 60 rows = 15.2
Arrow to POSITIONING PROGRAM and push STEP
Arrow to GARMENT POSITION INPUT and push STEP
Choose the 40 X 60 Icon and push STEP
Input 14.5 for your width and push STEPInput 15.2 for your length and push STEP
If this is your first garment, G1 will show on the screen. If not, select your garment shape number and push STEP.
If you get a "Garment # has not been completed" notice, go back to the GARMENT DESIGN icon, select the GARMENT ALTERATION icon and step through the process to END.
Now Press STEP and you should be able to go back to GARMENT POSITION INPUT.
Go to the ROW COUNTER SET-UP icon to select Row Count 0
Go to the KNIT ICON and you're ready to knit.
Now, rather than actually threading up and knitting the whole garment, why don't you go back to ROW COUNTER SETUP and set your beginning row count number to 176. The machine's display window tells you that you have needles 71 on the right and 71 on the left in work. Without putting any yarn in the carriage, let's just knit the neck shaping and see what happens.
Pull needles L 71 to R 71 into B position. Place your carriage on the right and knit to the left.
RC 177, the machine beeps. It's telling us that we are going to knit 1 side of the garment.
Arrow to the right.
Push the STEP key.
Your display turns to negative but it shows you that needles R 10 ~ R 71 are in work.
Prepare your needles this way:
All needles left of 0 should be pushed out to E position.
Also push needles 0 to 9 on the R side of 0 to E position.
Now needles R 10 to R 71 will be in B position.
Put your carriage in hold. Push the STEP key.
Your display returns to normal. You're ready to shape your right side.
NECKLINE SHAPING:
RC 178 K to right. Display says R 12 ~ R 71. Push 2 needles at the center (neckline) to E position. K to left. RC 179 Display says R 14 ~ R 71. You don't want to shortrow 2 sts on neck while the carriage is on that side so ignore the display and K back to the right.RC 180 Display reads R 16 ~ R 71.
Bring 4 sts on the neck side (L) to E position. K to Left.
RC 181 Display reads R 17 ~ R 71. You can shortrow 1 st on the neck, bring stitch 16 forward to E position. There is no need to wrap when you shortrow 1 st on the side of the carriage.
K to the Right.RC 182, 183, 184, 185 bring 1 st on left to E position.
Carriage ends on R, K to left.
RC 186 Display reads R 21 ~ R 71.
Continue knitting to Left.
RC 187 & 188 Bring 1 st on left to E position, K across.RC 189 Knit to Right
RC 190 Begin manually decreasing ~ transferring st 23 to 24. Push needle 23 to A position. K across.
RC 191 & 192 Continue knitting across
RC 193 Knit to leftRC 195 Decrease ~ transferring stitch 25 to 26. K to Right.
RC 196 197 & 198 Knit across
RC 199 Decrease ~ transferring st 26 to 27. K to Right
RC 200, 201 & 202 Knit Across
SHOULDER SHAPING:
RC 203 Display reads R 27 ~ R 71. Machine beeps at you. It's time to begin shoulder decreases. K to Right.
RC 204 Display reads R 27 ~ R 68. you cannot shortrow the right shoulder when the carriage is on the right so leave all needles in place and knit to Left.
RC 205 Display reads R 27~R 63. Pull 8 needles on the right to E position so that needles R 27 and R 63 are in B position. Knit to Right.
RC 206 Display reads R 27 ~ R 60. Wrap yarn under needle # 64. K to Left.
RC 207 Display reads R 27 ~ R 55. Bring 8 needles on the right to E position. K to Right.
RC 208 Display reads R 27 ~ R 52. Wrap yarn under needles # 56, K to Left
RC 209 Display reads R 27 ~ R 47. Bring 8 more needles on the right to E position. K to right.
RC 210 Display reads R 27 ~ R 44. Wrap yarn under needle # 48 and K to Left.
RC 211 Display reads R 27 ~ R 39. Bring 8 more needles on the right to E position. K to right.
RC 212 Display reads R 27 ~ R 34. Wrap yarn under needle # 40, K to Left.
RC 213 Display reads R 27 ~ R 31 Bring 8 more needles on the right to E position. K to right.
RC 214 Display reads R 27 ~ R 27. Put all shoulder stitches in upper working position or D position and K to Left.
Remove garment yarn.
Thread up waste yarn and carefully knit back to Right. Knit at least 6 rows of waste yarn and remove right side from machine.
Push STEP
KNIT ONE SIDE is again showing on the display
Select your left side and press STEP
Prepare needles ~ pulling needles L 10 to D position. Push STEP to return display to positive
With carriage on left, knit across to the right
.Continue knitting just as you did for the right side. Remember to watch your display to know which needles to decrease and don't forget the short row rules.
At Row Count 214, you'll get the message, KNITTING IS COMPLETED.
The machine will beep.
Be sure to knit one last row across shoulder stitches and take left side off on waste yarn.
You have now completed 1 piece of your garment.
Try inputting the sleeve without my help. It's a symmetrical shape. You input it ~ starting at the lowest point and you only have to input half the sleeve.
Start at center bottom and end at center top. You'll be using Line # 4 for S 2.
Feel free to make copies of this article for your personal use or for use in classes. The following copyright notice must appear on all copies
Copyright Rosalind Porter, Piney Mountain Cottage 1997-2008
Monday, January 14, 2008
Easy Summer Shell
I just posted an easy oversized cardigan pattern that was pretty much charted the same way this one is and as a matter of fact, I made this shell to go with that cardigan
Done with a Garter Carriage (if desired) This can be done with any machine (any carriage) and any pattern.
Make a swatch with desired pattern and carriage
Worksheet:
Draw a rectangle and put in the following markings:
1. Measure your chest and add 3" Divide this number by half and put the answer at the bottom of your rectangle.
2. Measure your favorite garment from bottom of shell to underarm--
Put that answer along the right edge of the rectangle. Draw an X up about 3/4 of the way to the top. This is armhole marker.
3. Measure favorite garment from underarm to top of shoulder. Put that total above the X on the right edge of rectangle.
Now measure your swatch.
A: ______ number of stitches per inch
B: ______number of rows per inch
1. Multiply 1 X A and put that number in at bottom of rectangle as ___stitches
2. Multiply 2 X B and put that number in at bottom under the X as ___rows
3. Multiply B X 3 inches and put that number in at the neckline
4. Multiply 3 X B and put that number in at the top (above X) as ____rows
Divide the top into 3 and put 60 stitches in the center section....divide the remainder by 2 and put that on each side, that's the # of stitches you have for shoulder.
KNITTING YOUR SHELL FRONT:
With garter carriage tension set 2 numbers below garment tension, Cast on #1 (from worksheet) and knit 20 rows in 1 x 1 rib.
Don't change row count, Change carriage to garment tension and knit in desired pattern to #2 on worksheet.. Stop and mark your edges with a piece of waste yarn. Change row count back to 0.Knit straight on up in pattern to # 3 in worksheet. Stop and mark the center 3 stitches with waste yarn. Continue on up to # 4.
Take off machine with waste yarn in 3 sections with 60 stitches in the center and the remainder on each edge.
BACK:
Make another piece exactly like the first but it's not necessary to mark # 3. (cut and sew, we will only cut the front).
FINISHING:
Hang 1 side together at the shoulder by hanging first piece with right side facing you and second piece with wrong side facing you (so the 2 right sides are facing each other on the machine.
Latch tool bind off around 1 gate peg.
ARMHOLE RIBBING
Hang entire armhole on the machine from marker to marker--evenly spaces so that the shoulder seam is at 0 making sure you have same # of needles on both sides. K 1 row with regular carriage and then put garter carriage on and knit ribbing for 10 rows. Back Stitch Bind off:
To back stitch bind off, end with carriage on the left. Break yarn about 2 1/2 X width of work.
Thread tapestry needle and insert through the 2nd stitch from left and back out the 1st stitch. Take 1st stitch off machine. Insert through 2nd stitch from left and back out 1st, remove 1st from machine. Continue across. You can leave the front neck as it is and call it a boat neck (it will roll a little which is OK) or
CUT AND SEW CREW NECK:
With a piece of paper, Draw a half circle from the 2 neck edges down to the markers you placed in # 3 above.Cut this half circle out and use it to either baste a neckline on your sweater using garment yarn and very large basting
stitches or use a quilters disappearing pen or chalk. (don't use a contrast color thread, it will always show and you won't be able to get it out if you sew over it).
With straight stitch sewing machine, sew a line along the basting mark being careful not to stretch.
If you have zig-zag capabilities, sew a zig-zag line right over the first line
With straight stitch sewing machine, sew another line right next to the zig-zag, doesn't matter if you go over it just a little...
Cut the neckline out a little ways away from the sewing line but don't leave a lot. DO leaving all the sewing stitches on the garment.
Hold the neck edge up to the knitting machine DON'T STRETCH and sort of hang it gently on the gate pegs so see how many stitches you need for your neckband.
1. Cast on and knit 24 rows of ribbing at 2 numbers below garment tension.
Take off machine on scrap yarn or use garter bar if you are comfortable with it.
2. With right side of garment facing you, hang neck opening on the same needles picking up just below the stitched line.
3. Bring all needles into hold position. Push neck behind latches against the machine bed.
4. Hang ribbing back on the same needles, keeping rib stitches IN the latches. (now work is behind latches, ribbing is in latches. Put some weights on the ribbing to help hold it down.
4. Close all latches using your ruler or a piece of paper or credit card. With garter bar or ruler gently push needles back through the neckline making sure latches stay closed.
5. Hang a hem from the ribbing cast on edge on the same needles, picking up your e-wrap and hang 1 stitch on each needle.
6. Latch Tool Bind off around 2 gate pegs
Hang second shoulder and latch tool bind off around 1 gate peg. Complete second armhole ribbing.
Sew up side seams.
Feel free to make copies of this page for your personal use or for use in classes .
The following copyright notice must appear on all copies
Copyright © Rosalind Porter, Piney Mountain 1997- 2008.
Oversized Cardigan
This is the perfect project for beginners and advanced machine knitters alike. Beginners will get a good lesson on how to measure for a simple shape. Fit isn’t absolutely important but, trust me, if this is too big you won’t like it.
If you have a garter carriage, try making this cardigan with it.
It’s the perfect garment for that accessory because you will be making a series of rectangles, and there is very little shaping required. It’s also perfect for the Brother Lace carriage because, again…there is very little shaping required.
If you would like this to be more of a jacket, then add 2 more rectangles, making yourself a couple patch pockets 5" X 5" and put about 5 rows of 1" rib at the top of them. Try the cardigan on with the pockets pinned to it and decide where you want the pockets.
If you want to add yet another couple rectangles, make a couple more 5" x 5". Fold them in half diagonally and stuff with a little polyester quilt batting. Sew into the cardigan as matching shoulder pads...again, pin them first, try it on and decide exact placement (it's easiest to do this with the jacket inside out.
YARN: Use any yarn you desire and any carriage, also any machine and any technique.
PATTERN USED: This is your creation. Close your eyes and picture yourself in a, sort of longish cardigan with rather full sleeves (or shape the sleeves if you don't like full ones). Picture it as you walk. Picture yourself wearing it. Picture it with a skirt or pants. OK? Now, what does it look like in your picture? Is it slinky and shiny? Is it holey and lacy? Is it textured and thick? OK, now find the stitch pattern you want to use to make it like you are picturing it.
TENSION: Before you go on, make a swatch 50 sts by 50 rows, you're going to be able to use any yarn, any gauge, any tension with this pattern but you want it to be right. Wash and dry your swatch ....or at least let it rest overnight.
WORKSHEET:
Get out your calculator, your tape measure and a notebook. You have a little work to do before you knit.
Tension = _______ stitches per inch _______ rows per inch
A. WIDTH OF BACK: Measure your bust and add 4 or 6" (your choice) and divide that answer by 2. Multiply it X your number of stitches per inch from "tension" above.
A =(your answer) ________________.
B. LENGTH OF GARMENT, TO UNDERARM: Your cardigan is 20" long from the hem to the underarm. Multiply 20 X your rows per inch from "tension" above.
B = (your answer) ________________.
C. ARMHOLE DEPTH: Your cardigan is 9" long from underarm to shoulder. Multiply 9 X your rows per inch from "tension" above.
C = (your answer)_________________.
D. WIDTH OF FRONTS: D = 1/2 of A minus 1" (your front band will be 1" wide)
D = (your answer) _________________.
E. SLEEVE WIDTH: Multiply 18 X your stitches per inch (18 is the width of your armhole front and back together).
E = (your answer)__________________.
F. SLEEVE LENGTH: Measure yourself across the back from the middle of your back to the end of your wrist where your sleeve will end. Bend your arm just a little at the elbow. Subtract that figure by 1/2 of A and subtract 3" for cuff. Multiply that answer X rows per inch (from "tension")
F = (your answer)__________________.
G. SHOULDER WIDTH: The number of stitches you have left for shoulder after binding off the neck stitches. Fill this in later.
G = (your answer)__________________.
Ready to Knit
BACK:
1. RC 00. Cast on the number of sts for A and knit 30 rows 1 x 1 rib at 1 tension less than garment tension.
2. RC 00. At garment tension knit to B, mark each side for the underarm.
RC 00. Continue knitting to C. Bind off the middle 60 sts for neck and take the remaining stitches off in 2 sections for shoulders. (Mark this number down as G).
FRONTS Make 2 alike:
1. RC 00. For the Right Front, cast on needles 1 to D on the right side of 0. Reverse the bed setup for the Left Front. Knit 30 rows 1 x 1 rib at 1 tension less than garment tension.
2. RC 00 At garment tension knit to B. Mark appropriate edge for underarm.
3. RC 00 Knit to C. Take off on waste the same number of shoulder stitches as the back (G). Take the remainder of the stitches off on waste for the neck.
Make another front the same but mark the underarm on the opposite side of the bed and take the shoulder and neck stitches off on the opposite side of the bed.
SLEEVES Make 2 alike:
1. Cast on the number of stitches in E with waste yarn and knit to the number of rows in F. Take off on waste yarn.
2. With wrong side facing rehang the cast on edges of sleeves by doubling or tripling your stitches to fit. (for small sizes 70 needles) (medium to large sizes 80 needles). Knit in 1 x 1 rib for 30 rows and back stitch bind off with tapestry needle.
To bind off with tapestry needle, start on the left, Thread tapestry needle with 3X the width of the work on your bed. Put tapestry needle through the 2nd needle from end and bring it out the first needle from end. Remove first stitch from needle. Run tapestry needle through (new) 2nd needle from end and out the first. Remove first stitch from needle....continue across, don't pull work tight, try to keep it nice and stretchy as a bind off should be.
NECKBAND:
Mark the 2 fronts for the neck, making the center 4" deep. Sew and cut and put aside.
To mark the necks, get a piece of paper and a pencil. Divide 60 (the # of sts on the back neck) by your stitches per inch to get an accurate neck width. Cut your paper that wide. Fold it in half and measure 4" down the fold. . Put a little mark on the paper. Now draw a half circle from the 4" point back up to the edge, making the 4" center the deepest point of the half circle. OR if you have a neckline template, use it. Remember though, this is a cardigan, you only need half the template. Pin the half onto the first front and using the garment yarn and a tapestry needle, I make large basting stitches to mark my neckline. Now go to the sewing machine and sew a straight stitch right over the basting stitches. Go back over that same line with a zig zag stitch. OR serge, cutting at the line you basted. If you are sewing cut just above the line you sewed.
Put the fronts aside for now.
FRONT BANDS:
Knit 2 front bands by e-wrap casting on 21 stitches. Put the carriage in hold. Tension is 2 numbers less than garment tension *Pull the middle needle out to Hold Position and knit across from right to left Push the needle back to work position and knit back to the right. * Repeat from * to * for 29". You will be tucking the middle stitch all the way up the band. (you can take the band off on waste yarn and measure the front, stretching slightly, if you wish). Make your buttonholes on the right band. I usually put an odd number of buttons on the front of a cardigan, either 5 or 7.
GARTER CARRIAGE BUTTONHOLES:
I recently started making my buttonholes on the sewing machine. Thanks to someone on the Knit List, I got a great hint that helped. She told me to make vertical buttonholes on a horizontal knit and horizontal buttonholes on a vertical knit. IT WORKS! Another hint....I use Solvy on top and bottom of the knit when I make the buttonhole. This keeps the knit sewing smoothly and it dissolves with a Spritz of water when you're done. Try the whole thing on a swatch first before you go to your sweater.
MORE BUTTONHOLES:
Below are 2 variations for buttonholes. Try them both on a swatch and decide which you like, basically they are the same thing.
This is a garter carriage variation of a buttonhole band in the Brother Ribber Techniques Book. Unfortunately that book is no longer in print but if you have it, try the ribber variation, it is great too.
Buttonhole technique # 1
E-wrap cast on 14 stitches and knit K1, P1 Rib to the first buttonhole row ending with carriage on the right ...*Put 6 stitches on the left into Hold position (with waste yarn, hand knit them back to A position)....K1, P1 for 7 rows, ending on the left. ...Put the 6 stitches on the right back to A position with waste yarn. (all sts are now in A position)...Grab the yarn under the garter carriage and make a loop with about 6" of yarn so that when the garter carriage starts to knit again, you are holding the 6" loop in your left hand....Bring the needles in A position back to B position ...Knit 6 more rows....Bring all needles back into work position and continue knitting to the next buttonhole row. ...Repeat from *
When you are finished, you'll have those 6 inch loops in the middle . Cut them in half and weave into the back of the work or use them to whip around the buttonholes.
Buttonhole technique #2
...Roll off some yarn into a ball to be used later....E-wrap cast on 14 stitches and knit K1, P1 Rib to the first buttonhole row ending with the carriage on the left....*Put 6 stitches on the right into Hold position (with waste yarn, hand knit them back to A position)....Knit 6 rows, carriage ends on Left....Take yarn out of carriage and bring all A position stitches back to B position. Hand Knit the stitches on the left back to A position with waste yarn....Place carriage on the right side of the machine and with the extra ball of yarn (step 1 above) knit 6 rows....Bring forward all needles into working position and knit across all stitches. COL. ...Break off extra yarn, engage yarn from cone and continue knitting to next buttonhole row. Repeat from *
Take your bands off on waste yarn. Sew the band with a mattress stitch to the fronts of the sweater and slip stitch the band facing to the back.
FINISH THE NECKBAND:
1. Hold the entire neck edge up to the machine to measure how many needles you will need for your neckband Measure without stretching and include the front bandsin the measurement.. Lay cardigan aside.
2 Cast on the number of stitches you'll need and work a 1 x 1 rib for 60 rows Take off with scrap yarn or garter bar.
3. With the right side of garment facing you, hang neck opening on the same needles, picking up below the stitched line on the fronts and below the bound off stitches from the back neck edge.
4. Bring all needles into hold position. Push your work behind the latches against the needle bed.
5. Rehang the neckband stitches keeping them in the latches.
6. Close all latches. With garter bar or any straight edge push needles back through the neck stitches.
Hang hem from neckband cast on edge. Latch tool bind off around 2 gate pegs.
FINISHING:
Sew up side seams and attach buttons and you're through!
Feel free to make copies of this page for your personal use or for use in classes . The following copyright notice must appear on all copies: Copyright, Roz Porter, Piney Mountain Cottage 1996.- 2008
Sunday, January 13, 2008
Making a Fatigue Pullover


The brown sweater is a Fisherman Rib boys fatigue sweater with full needle rib yoke. The lilac pullover is a Fisherman Rib sweater also but the yoke is a 1 x 1 fairisle, I used pattern 30 in Stitch World 1 which is a seed stitch. On the right corner at the top you'll see a matching beret. The hat part of the beret (the top) is polar fleece. The band is the same fairisle I used on the fatigue yoke. I also used up some scrap polar fleece for the white flower that embellishes the hat. On the bottom right is the lilac pullover with a matching polarfleece vest. The vest is trimmed with the same fairisle as the yoke of the fatigue.
I've always wanted to make my husband a Fisherman Rib pullover like the ones I've seen in all the sports catalogs called a Fatigue Sweater. Fisherman rib is so comfy and the fatigue would be a little dressier than a plain pullover. I love the look. When DAK 6 came out, I discovered a secret that makes this particular sweater really easy to design. In this lesson we will learn how to start with a standard garment shape and tweak it to our personal specifications in Original Pattern Drafting.
SOME KNITTING AND CHARTING HINTS FOR THE FATIGUE SWEATER:
1. DAK is wonderful, it allows you to use 2 different gauges, 1 for the body and 1 for the yoke. However, make all your body pieces before you make the yoke. This way you won’t forget to change the tension back after making the yoke. Also be sure to make a note in Tension notes, write down both tensions so that when you switch back, you won't have forgotten.
2. On the back, Chart the back with a neckline curve but make the back neck straight. That little half inch doesn’t make a big difference in the finished garment so you really don’t need the curve but you do need to make sure you have the same number of stitches on the back shoulders as you have on the front shoulder + yoke shoulder piece.
3. Make your tension swatches about a week before you actually start the garment. Tuck stitch takes a lot of weight and it’s going to be about a week of resting before you can really measure that swatch. Also, make your swatches 100 X 100. Don’t forget, you need a separate swatch for the yoke since it’s full needle rib. You can then practice your sewing machine buttonholes on the full needle rib swatch.
4. Add another 1" width to your sleeve cuff because your sleeve gauge is set for tuck which knits wide and your cuff will be plain rib which is thinner.
5. Make sure you make the front opening deep because you are going to have to join both shoulders to make the neck rib. I went 8" deep on mine and that was plenty for a commercial neckline ( I did it as if I were doing a cut and sew neck but of course, it wasn't cut and sew 4 inches stockinette, 7 inches 1 x 1 rib, 4 inches stockinette.
Start with Standard Garment Shaping and select New Garment. Pick Adult, Male, Sweater, Straight Sleeves, Straight Front Neck, Straight Back Neck. Click on OK.
Select your tension size (hint) I always design in a standard size of 7 sts 10 rows per inch when I first start. This can always be changed after you've designed your garment and have actually done your tension swatch. Click on OK and then pick Classic Ease.
You will be asked to select your size. I usually start with a standard size, by going with the chest size I wish to make, i.e. my husband measures 40" but wears a size 44 so I select the Standard Size 44. I work through the body measurements but I change ease to 0 at chest and hip. He likes his sweaters to be 17" from bottom hem to underarm and I know his pullovers need to be 11" from underarm to shoulder. The Nape To Garment Length will be 28" less 3" for bottom rib so I put in 25" . I pretty much go with default on all the other measurements for my husband but this is where you need to customize the size to fit your guy. This is my preferred method of working with sizes, you may like to do it another way.
It's time to go into Original Pattern Drafting. Click that Icon (it's the second set of Icons from the top showing pattern pieces). You will be asked to save your work, by giving it a name. Go ahead and call it Fatigue if you wish.
Working with Original Pattern Drafting:
You'll see your garment pieces on the screen. Go ahead and delete one of the sleeves, they are both the same and 2 of anything that is the same is unnecessary, especially if you need to print out your pattern shapes.
Click on one of the body pieces. Press the Space Bar to turn on the large cursor.
Using the Measure Edge Tool:
I like to check my measurements before I go any farther.
Using the Measure Edge Tool:
I like to check my measurements before I go any farther.
First I delete one of the points at the underarm on both pieces. Then I use the Measure Edge tool (the middle measuring tape at the bottom left) to make sure that I have 11" underarm to shoulder and 14" underarm to hem (remember I want 3" rib at the bottom and the bottom ribbing doesn't show in DAK).
When you use the Measure Edge tool you must go clockwise. If you want to turn off any measurement that is showing on the screen later, click on the Measure Edge tool and then click the point where you started the measurement. This is important, if you clone a piece later (as we will) you won't be able to turn off the measurement numbers once you've changed the garment if you delete that first point.
Using Origin:
I like to move my 0 point (the Origin which is the first measuring tape on the bottom left)around a lot because it makes things to easy to measure if you can start with 0. Remember you have to start and end with a point so moving Origin to the starting point only makes sense. Then you can watch the numbers change on the bottom right corner as you move your mouse around. Moving Origin to a starting point also makes the Piece Table option easier to use.
Using the Piece Table Option:
Turn on Numbering (to the right of the large crosshair icon on the bottom left) use the Piece, Table option to get measurements absolutely correct. X stands for your horizontal measurements and Y for the Vertical measurements. The Minus in front of a number denotes points to the left of 0 in the X measurement and below 0 on the Y measurement. Make sure both the front and back piece have the same measurements. (if you are unsure which piece you are working on, check the top of your screen, it will tell you which one is highlighted).
Select your Front piece. Mine happens to be the first piece on the left. Measure the neck opening. You want it to be 8.6" on the front and back pieces both. If it isn't insert a point at the middle bottom of the garment. Do this by selecting the Equal Parts Icon, tell it you want to insert 1 point and place the crosshair between the 2 bottom side points. Click on the left mouse button and you will have a point inserted right in the middle of the piece. Click on Origin and then click on the new middle point you've just created. This is all done so that when you move something with Mirror on, you can be sure it will be done the same on both sides of 0. If you don't have the origin in the middle, I can't predict the awful results you'll get but before you click the mouse button again, you can always Edit, Undo if you get something disastrous. Click on Vertical Mirror. Double click on one of the neck points and move it until the neck measurement is 8.5". Don't forget to change the back neck measurement to correspond but then come back to highlight the front.
On the front, Insert a point at the middle of the neck by again, click on the Equal Parts Icon. Put in 1 for number of points to add and click left mouse button. Click OK. Place the crosshair between the 2 neck points and click the left mouse button.
Select Origin and click on that middle point. Make sure your Mirrors are Off. (If they are darkened, they are On, click on them to deselect them). Place the cursor at the middle neck point and double click the left mouse button.(The cursor turns into a pair of pliers signifying you are moving a point). Drag the mouse down to 1" above the armhole , making a V. Click the Left mouse button to place the point. Now move the point to 2.5" to the left of the middle (origin) by double clicking the V and watching the measurements at the right bottom of the screen.
Remember, you can use the arrow keys on the keyboard to more precisely control the cursor movements. Your V will now be cockeyed, shorter on the left. Select F2 to add a point and add a point to the neck anyplace to the right of the one you just moved. Select F2 again to turn off Add. Double click the new point and move it down until it's at 2.5" to the right of the middle and again 1" above the armhole point. You should now have a V shape neckline that doesn't come to a point but is straight across at the bottom, 5" wide. Be sure to turn off all measuring references now. You don't want the red lines and red inch references because you won't be able to delete them later. To turn them off, click on the middle measuring Tape at bottom left and then click on the beginning point of your measurement i.e. you measured your right armhole starting at the top shoulder point and moving down to armhole point. To delete that, click on measure and then click on the top shoulder point. The reference will disappear.
Making that yoke:
You are going to be amazed at how easy it is to chart a yoke to fit in that front space you just made. Make sure your front is still highlighted. Select Piece, Copy. Call the new piece Yoke. Select Shift F2 for Delete and start deleting points on the new piece. Start at one bottom corner and click. Then the center bottom and the other bottom corner. Now the next 2 points going up. All you have left to delete are 2 points that were the shoulder, delete them and you have an inset piece for your yoke. It's fun at this point to drag the inset over to your old front piece and place it, it fits!!!
Making your Front neckline curve and plackets
Using the magnifying glass, magnify the yoke to make it easier to work. Put your origin at the top of the yoke. Use the Equal Parts Icon and divide the bottom of the yoke into 2 equal parts by selecting 1 when it asks you how many points. Select Alter, Curve. Select 5 points and neckline # 1. Bring the curve down 2.5". (since we've made the neckline a little wider than usual at 8.5", you can get away with a little shorter drop. Also, no one is going to button that fatigue all the way up). Use Shift F2 to delete ½ of the yoke by deleting all the points on the right of the piece. Use Shift F2 again to turn off delete.
You'll want to knit it the placket as you knit the yoke piece so you have to decide how wide you will want it to be and add that width to the placket. When you knit it, you'll knit one side, go back into Original and flip the yoke and knit it again. I have decided that I want my placket to be 1" wide and I add the width now by double clicking on the top right point and moving out 1" then double click on the bottom right and move it out 1". Placing Origin at the right of the yoke and turning on the large crosshair cursor (space bar) makes this job very easy.
That should do it. To finish up, you want to check to make sure your sleeve top measures double the front or back armhole amount.
You'll need to make 2 swatches for this project, one in Fisherman rib for the body and 1 in full needle rib for the yoke. The yoke can also be plain stockinette, it's up to you, you are the designer but you'll still need 2 gauge swatches. Don't forget to change the gauge in DAK when you knit the different pieces so that it will chart correctly for you.
Feel free to make copies of this page for your personal use or for use in classes . The following copyright notice must appear on all copies Copyright © Rosalind Porter, Piney Mountain Cottage, 1997-2008
Kitchener Stitch
In answer to my question on the Internet Knit List back years ago I guess (sorry I don’t remember the date of this) WHY CAN'T I KITCHENER STITCH?
Several people answered my plea for help and we even learned how the word Kitchener got its name.
One of the most important hints I got was:
From Norma Sweet:
Always start with the stitch that the yarn end is on, go through it (as if to K) and then go to the stitch opposite it. Back to it and continue. If you don't start with that stitch, you'll be 1/2 stitch off all the way across.
******************************
From Brenda Staurowsky:
Back in my hand knitting days when I would graft shoulder seams together, an owner of our local knit shop taught me how to do this. This is in regards to your Kitchener stitch. "Pretend" you have your scraped off sts. on two regular knitting needles. OK-- You have a "top" needle and a "bottom" needle. Now this is really easy cause you just keep repeating to yourself-- Knit off Purl on Purl off Knit on In hand knitting, what you are doing to start with is to take your yarn which is attached to the top "row" and take that to the bottom st. as if to knit and knit it off. Take your thread thru the next bottom st and go thru as if to purl and leave it on. Go to top needle (row), purl off, then yarn thru next st. and knit leaving it on. What is happening here is you're going thru the sts the correct way. Knit ---(bottom row) Purl ---(bottom row) Purl ---(top row) Knit ---(top row) Bren
*****************************
Denise Gaertner:
The following was just posted to one of the hand knitting lists as being a quote from Elizabeth Zimmerman:"Grafting? Weaving? Kitchener Stitch? What is the explanation of the latter term? I considered offering a prize in Wool Gathering for a logical derivation, but Dorothy Camper, of Madison, Wis. anticipated my little scheme, and contributed the following . . . ."Kitchener Stitch is called after Lord Kitchener of Khartoum, British military hero of Boer War and WW 1. He associated himself with a Red Cross plan to dragoon US womanhood into knitting 'comforts' for the men in the trenches, and contributed his own sock design, which included a squarish 'grawfted' toe. Hence the Kitchener Sock; hence Kitchener Stitch. Truth is indeed stranger than imagination . . . ."
*****************************
Jennie Merritt wrote: This is the handout I've written for my advanced beginners class for Kitchener. It's all a matter of pretending (used the words "think of" in the pattern but use "pretend" verbally when teaching) and remember what we are pretending.KITCHENER STITCHA hand manipulated stitch that results in a row of knit1. Count the stitches on each needle to be sure both needles have an equal number.2. Hold the needles parallel with purl sides facing each other.3. Think of the knitting needle closest to you as the knit needle, and the knitting needle away from you as the purl needle. (K comes before p in the alphabet). Think of the tapestry needle entering each stitch knitwise or purlwise.4. With the tapestry needle and a length of yarn at least three times the width of the fabric, enter the first stitch of the purl needle knitwise. Leave the stitch on the needle.5. Enter the first stitch of the knit needle knitwise. Drop the stitch from the needle. Each time you enter a knit needle stitch knitwise, drop it from the needle.6. Enter the next stitch on the knit needle purlwise. Leave the stitch on the needle.7. Enter the first stitch of the purl needle purlwise. Drop the stitch from the needle. Each time you enter a purl needle stitch purlwise, drop it from the needle.8. Enter the next stitch on the purl needle knitwise. Leave the stitch on the needle.9. Repeat steps 5 - 7.
*****************************
Marion Stephen:
Hi, Roz - I have hand-knitted socks and finished them with Kitchener stitch for over 50 years and I can't remeber the Kitchener formula from one pair to the next. So I keep an index card with instructions in my hand-finishing box. Here it is:Two-needle KitchenerKnit first stitch on front needle and dropPurl second stitch on front needle and leavePurl first stitch on back needle and dropKnit second stitch on back needle and leaveRepeat these four steps until all stitches are sewn off.By the way I have always had trouble working from sts that have been scrapped off, so I take the raw sts off the scrap onto two sock needles and Kitchener from the sock needles beginning at the right and the wrong side of the sock is inside with the right side facing.
*****************************
Charlotte Wood:
One of the neat tips I think I saw on this list awhile back was......after you have finished the toe of a sock (or before you start if you are knitting the other direction), knit 2 rows of waste yarn, then switch back to main yarn that you want to graft with, and knit 2 rows, then several more rows waste yarn. Now when you block this you have set the stitch size in the 2 rows of main yarn. You can carefully remove the waste yarn down to this and use it to kitchener with.....the stitches should practically fall into place as they are already preformed by the blocking. Sorry, I can't remember who posted this tip....I sure like it. (I would also do this on a sideways skirt...a grafted seam looks so much better than anything else I have seen.)
*****************************
Laura:
I learned to Kitchener by doing row with ravel cord first then following it with the main yarn. That way I could really see what I was doing (like Roz, I was obsessed with socks and couldn't close the toes properly!). I got the directions from a handout at my local hand knit shop. Another thing that helps me is doing it from the purl side whenever possible. For some reason it just seems easier to do.
*****************************
Nancy Philipp:
Don't know if this will help but I will tell you how I do the Kitchener stitch. Generally the knit material you are joining has waste yarn rather than open loops. I just follow the waste yarn path with the main yarn from one piece to the other. This is like a continuation of the knitting stitch (knitting with a tapestry needle). The thing that really makes the Kitchener seam invisible is matching the tension of the knit material -- too tight and there is a definite seam; too loose and there is a ladder. Remove the waste yarn; weave in yarn ends, steam and your done.*****************************
mabcymraeg@earthlink.net
Hi, I couldnt do kitcheners stitch to save me no matter what the directions were. Then once I sat down and worked it out myself. Once I did that and knew what was going on I haven't had problems since. So I would suggest that to everyone. Do it a few times with the directions -till you 'almost' have it and then work it out on your own. It will never be a bugaboo again.
*****************************
Melva Bass:
Roz, why don't you end your rows with ravel cord and waste yarn, then thread your needle and follow the ravel cords? When it leaves your garment piece and goes to the scrap, skip up to the other garment piece and follow it through there and then back to the other piece, etc., back and forth, until you're through, pull out the ravel cords and even up your stitches. After a time or 2 , you won't need the ravel cord.
*****************************
Lou Damewood:
Roz---- Thought you used to be a hand knitter. All hand knitters learn this early on. I learned it from a Learn How Book from Woolworths too many years ago to count. It is basically making a row of knitting by tapestry needle. Usually people tend to pull too tightly on the thread. You have 2 rows of open stitches facing each other. Observe the way the stitches lay. Go into one and then the opposite one-- Go back into the first and through to the adjoining stitch. On opposite side do the same thing. Practice on old swatches until you see how it is supposed to look. Try from the front first and then practice from the back or purl side. Some find one easier and some find the other. Almost any hand knitting instructions show the pictures of this in detail.
*****************************
Nella TenBroeke:
Roz, whenever I teach someone to Kitchener I have put the "right sides" together as we do for sewing material, tuck the scrapped off edges down in the center of this. the stitches to be used will be between the scrapped off stitches (they say "here I am").have the needle going through both stitches and before pulling it through stop and snug the previous "pull through". A tapestry or double eyed needle can be used. I usually say, new, old, stop, snug (new stitch, old stitch, stop, snug). don't snug too tight (you are actually knitting another row and don't want it to show)!!! I never could do it with the wrong sides together as is shown in diagrams in some books.
*****************************
Leslye Solomon has described Kitchener Stitch and has good close-ups on her video Sweater Finishing for Hand and Machine Knitters. Those of us who need a visual aid might find this invaluable.
*****************************
Margaret Hall :
I find that the easiest way is to work from the purl side. If the stitches are on a contrast waste yarn, you just follow the route and tension of the waste yarn from side to side. Margaret
*****************************
Deborah Shanahan :
The Kitchener stitch is difficult to describe, but simple to do. Close your eyes, take a deep breath and forget the detailed steps; forget that your dealing with knitting.Here's what a Kit St really is: a series of back-stitches sewn into *predetermined* holes, alternating between 2 pieces of fabric. In fact, while you're learning to do it, use woven fabric. Pin the 2 pieces of fabric to paper to keep everything stable, maintaining about an eighth-inch space between them.For right-handed people the needle goes from right to left, into the fabric ALWAYS from the top, down under, and back up again. Look at it while the needle is still in the fabric. It's like every basic sewing stitch you ever did. Now take a stitch in the second piece of fabric the same way, sticking the needle into the fabric at a point that would be half-way between where the needle went in and came out, relative to the first piece of fabric.Now make the second stitch on the first piece of fabric. Where do you poke the needle? Right into the hole it came out of on the previous stitch. Keep alternating stitches between the 2 pieces of fabric, always poking the needle into the hole where the thread came out of on the stitch before, working from right to left. After about 10 stitches on each pieces, stop and look at your work.What you'll see on the front is a zigzag stitch, just like a sewing machine zigzag. That's the "knit" side. The back side should look like 2 parallel rows of straight machine sewing. Those stitches would be the "purls" if you were working with knitted fabric. If you didn't quite get it, take a few more stitches until you do. EUREKA!! Once you find the way, you'll never have to read or remember the Kitchener stitch steps again. Left-handed people must have even more trouble than righties do with Kit St directions. I assume (not being a leftie myself) that you sew from left to right. Again, you're just making a series of back stitches alternating between 2 peices of fabric. When you actually work with knitting, you usually finish knitting with the yarn on the right. Just rotate the work so that the yarn end is on the left, and start sewing.What about those *predetermined* holes that I mentioned a few paragraphs back? When you actuallly work with knitting, they're the yarn loops from your 2 pieces of knitting. You'll never get into trouble as long as you remember to start a stitch by poking the needle into the same loop that the needle came out of for the previous stitch on that piece of fabric.Hope this helps a few of you.
*****************************
Mystery Pattern
Since February is only a few weeks away, its time to post the Mystery Pattern
Shared by my sister, Jinny Davis - jdavis29@austin.rr.com
This is a MYSTERY PATTERN for you to try. Knit it, and see what you find. This pattern is courtesy of Norma Boutelle, a member of Jinny's MK Club in Austin Texas, who gave Jinny permission to share it. It first appeared on Prodigy and then reappeared on Compuserve when Jinny and I moved over to that medium. Now, hopefully it will remain with me and never get lost again! It can be knit on any standard machine. I've never done it on the hobby machine but I think I'll give it a try today and see what happens.
Cast on 2 stitches. Knit 2 rows.
Increase 1 stitches on each side every other row until there are 24 stitches.
Knit 2 rows.
Put 12 stitches on the left in Hold Position.
Set Carriage for Hold Position.
Short row 1 stitch on Carriage side at the beginning of each row until 3 stitches remains in work position.
Return 1 needle each row until all 12 stitches are back in work.
On the last row, when returning the 12th stitch into work, cancel Hold and knit all stitches, ending with the carriage on the left (24 stitches in work position).
Place 12 stitches on right in Hold and shape the other side the same as you did the right side.
(2 stitches in work position.)
Knit 3 rows over all 24 stitches, then decrease 1 stitch each side every other row until 2 stitches remain.
Bind off. Sew together.
Trim may be added at this point either by crochet, or machine knit trim. Or, try some beads and lace and maybe little I-Cord.
Enjoy this little mystery, especially in February.
If you want some super "February" yarn for this mystery, have a look at knitivity.com
Feel free to make copies of this article for your personal use or for use in classes.
The following copyright notice must appear on all copies
copyright, Rosalind Porter 2008
Subscribe to:
Posts (Atom)