
People have told me that they absolutely love the 970 Stitchleader (Knitking's Compuknit 5 Star) but that they have problems putting their garment shapes into it and others know how to get the shape in but have a problem knitting it from the little screen. Knitting with this machine should be a dream. This machine has it all, the patterning, the shapes, everything but a built-in robot to push the carriage.
I've been thinking, if we put in a standard drop shoulder sweater, all we'd have to do is make a few changes when we want to change the shape, make a tension swatch and start knitting. So, once you get your basic drop shoulder garment into your machine, you can save it if you have a floppy disk drive. Unfortunately, DesignaKnit is not equipped to save garment shapes and I don't know if it ever will be. If you have a blank cartridge, you can fill up the machine's memory and then save to the blank cartridge. Don't save to it until your machine is full because it will erase everything on the cartridge when it saves.
Once the personal basic drop shoulder sweater is in the machine it should be an easy matter to change the garment into a tunic, a V-neck, etc. All you have to do is go back to the garment front and back and using the Garment Alteration Icon add some length from underarm to hem on the front and back or change the neckline to a new one. You can change it into a cardigan going into Garment Creation and make a new front that is non-symmetrical and use the original back and sleeve. I can see lots of possibilities with having a standard shape that fits me in the machine, ready and waiting. Just be sure to keep a notebook of what you've done each time you've changed the garment so that you can always go back.
I came up with a fairly standard 40 inch drop shoulder pullover that is easy to input and knit but it does include some shaping. If you are having problems with the garment shaping options of the machine, try this simple little pullover. If you are having problems with the actual knit from screen directions, go ahead and put the garment shape in and pretend to knit it along with me. You can always delete the whole thing later and put in your own personal garment. It's possible to input a garment measurement into the machine in inches however metric is so much more accurate, it's better if you use centimeters.
Even so, I am so used to inches, my poor mind sees in inches....so I chart in inches and once I'm done, I convert to centimeters. I bought a calculator at Radio Shack called a Pocket Handyman. It converts from inches into centimeters for me. Simply put in the inch amount, push "inch", push "=" push "centimeters"....you've got your metric conversion!
In my schematic, I have not included measurements for ribbings. There is no need to input ribbing allowances on the machine in my opinion. I always suggest that whenever you put a garment into your machine, you FIRST draw it out on paper, make a note of your measurements and the number that the machine assigned that particular garment. Also be sure to note the Stage Numbers that you will be inputting. It's easy to get distracted when you are putting something into the machine; this will help remind you when you get back to it if that happens.
To start, here's what I'd like you to do. Go ahead and input the measurements as I've given them. Later you can delete the garment from your machine and put in your own garment but this is a practice exercise so let's practice and learn. We'll input the garment, put in a gauge and pretend to knit. For our exercise, these are the icons we'll be using:
(not shown, X =Width, Y – Length)
Bottom L to R: Step Key Stage Number, Knitting Icon, Garment Alteration
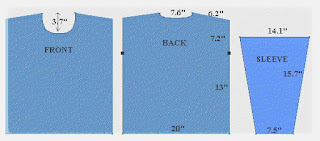
FRONT: S5 Y = 9.3 cm (3.7 in)
SLEEVE: S1 X = 9.5 cm
BACK: S1 X = 25.4, cm S1 Y - 42.4 cm, S2 X = 33 cm S2, Y = 42.4 cm, S3 X = 18.3 cm S2 X = 8.9 cm, S4 X = 15.7 cm, S3 X = 18.4 cm, S4 Y = 2.7 cm, S5 X = 9.7 cm, X5 Y = 1.2 cm
Let's input our sweater front. Turn on your machine and with the DIRECTION key arrow over to the DESIGNING PROGRAM icon. Press STEP.
Now select the GARMENT CREATION icon. Press the STEP key.
Number 1 will show on your screen along with 2 shapes, a symmetrical shape and a non-symmetrical shape.
The number 1 is your garment number, record it now.
Since this is a pullover, both sides are exactly alike from right to left therefore this is a symmetrical shape. Because it's a symmetrical shape, the machine knows it can mirror image and you only have to put half the garment in, starting at the center lowest point. Choose this shape then press the STEP key.
S1 appears on the screen to notify you that you are about to input the Stage 1 number. The Stages are the various shaping lines you'll need to enter for each separate part of the garment, they are shown at the top left of your CB-1 controller. Push the STEP key.
We will be putting in 1/2 of our garment, starting with the center bottom and going counterclockwise so shape 1 will be the #1 figure shown at the top of your CB-1 controller. It's 1/2 the bottom width of your sweater. Push the Number 1 key and then push STEP l.
Press STEP again.
X=? We have to tell the machine how wide our garment will be. Refer to our schematic. Our garment is 50.8 cm wide. Put in the number 25.4 (starting from center bottom, 1/2 of our 50.8 cm). If you accidentally put in the wrong number simply push C and then continue with the correct number. Push the STEP key.
S2 appears. Push STEP. Line #2 represents our vertical rows up the pullover. Select #2 as your shape line and press STEP. Press STEP again.
Y is your vertical measurement. Your length to underarm is 33.0 cm. (we could go on up to our shoulder line for this but we want the machine to remind us to put in an underarm marker). Input 33.0 and press STEP. S3 appears. Press STEP.
Put in Line #2 again (your vertical line from underarm to shoulder). Press STEP.
Y=? Again you need to put in the vertical measurement. Your underarm to shoulder is 18.3 cm, punch in that number and press STEP.
S4 appears. Press STEP.
Line 4 is our shoulder. We have a 1" slant to our shoulder, slanting up to the neck. Push line #3 for this stage. Press STEP.
Press STEP again.
X=? This is our horizontal measurement. That measurement is 15.7 cm. Input 15.7. Press STEP.
Y=? The length of our slant is 2.7 cm. Input 2.7 and press STEP.
Stage 5 is our last shape. Push STEP.
We'll use the curve #10 for this. Push 10 and then push STEP.
The first Icon which is slanted down to the left should be blinking, push STEP.
Your X measurement (horizontal) is 9.7 cm Punch 9.7 into the machine and press STEP.
Your Y measurement (vertical) is 9.3 cm. Punch 9.3 into the machine and press STEP.
We came to END. This means we didn't make a mistake with our measurements and we are now ready to knit. Make sure to push the STEP key to finish your creation. Then the main menu appears on the display.
If you had measured just a little off at this point, you could put in a straight horizontal line to make the neckline go to the middle. The secret here is to put in a large line...(10 cm). The machine will come back and tell you that you can only put in a short line and it will give you the measurement you need. If you need to go back to a previous stage, you can do that but only when you are at a place where the machine says "STAGE #" At that point, just arrow back where you need to be.
KNITTING OUR GARMENT: To continue on with our exercise, let's pretend we are knitting our garment. If you already know how to machine knit but haven't knit from screen before, this will be a little different for you. You need to learn to watch your display window and follow the "needles in work" numbers.
Let's also take a minute to review shortrowing procedures:
1. It’s easiest to shortrow the needles opposite the carriage, K across then when the carriage is on the shortrow side, wrap the last needle in hold (next to the last working stitch). Knit 2 rows and repeat. To do this, check the "needles in work" numbers in the display when your carriage is opposite the part you want to shortrow . The numbers in the display are the needles in work numbers.
2. When you have more than 2 rows between a shortrow (i.e. the pattern says, decrease 3 stitches every 3rd row) it's time to stop shortrowing and manually decrease the stitch ~ placing it on the working needle next to it.
Now we can knit our garment.
I chose a standard gauge of 7 sts and 10 rows for our sample. Or 40 sts = 14.5, 60 rows = 15.2
Arrow to POSITIONING PROGRAM and push STEP
Arrow to GARMENT POSITION INPUT and push STEP
Choose the 40 X 60 Icon and push STEP
Input 14.5 for your width and push STEPInput 15.2 for your length and push STEP
If this is your first garment, G1 will show on the screen. If not, select your garment shape number and push STEP.
If you get a "Garment # has not been completed" notice, go back to the GARMENT DESIGN icon, select the GARMENT ALTERATION icon and step through the process to END.
Now Press STEP and you should be able to go back to GARMENT POSITION INPUT.
Go to the ROW COUNTER SET-UP icon to select Row Count 0
Go to the KNIT ICON and you're ready to knit.
Now, rather than actually threading up and knitting the whole garment, why don't you go back to ROW COUNTER SETUP and set your beginning row count number to 176. The machine's display window tells you that you have needles 71 on the right and 71 on the left in work. Without putting any yarn in the carriage, let's just knit the neck shaping and see what happens.
Pull needles L 71 to R 71 into B position. Place your carriage on the right and knit to the left.
RC 177, the machine beeps. It's telling us that we are going to knit 1 side of the garment.
Arrow to the right.
Push the STEP key.
Your display turns to negative but it shows you that needles R 10 ~ R 71 are in work.
Prepare your needles this way:
All needles left of 0 should be pushed out to E position.
Also push needles 0 to 9 on the R side of 0 to E position.
Now needles R 10 to R 71 will be in B position.
Put your carriage in hold. Push the STEP key.
Your display returns to normal. You're ready to shape your right side.
NECKLINE SHAPING:
RC 178 K to right. Display says R 12 ~ R 71. Push 2 needles at the center (neckline) to E position. K to left. RC 179 Display says R 14 ~ R 71. You don't want to shortrow 2 sts on neck while the carriage is on that side so ignore the display and K back to the right.RC 180 Display reads R 16 ~ R 71.
Bring 4 sts on the neck side (L) to E position. K to Left.
RC 181 Display reads R 17 ~ R 71. You can shortrow 1 st on the neck, bring stitch 16 forward to E position. There is no need to wrap when you shortrow 1 st on the side of the carriage.
K to the Right.RC 182, 183, 184, 185 bring 1 st on left to E position.
Carriage ends on R, K to left.
RC 186 Display reads R 21 ~ R 71.
Continue knitting to Left.
RC 187 & 188 Bring 1 st on left to E position, K across.RC 189 Knit to Right
RC 190 Begin manually decreasing ~ transferring st 23 to 24. Push needle 23 to A position. K across.
RC 191 & 192 Continue knitting across
RC 193 Knit to leftRC 195 Decrease ~ transferring stitch 25 to 26. K to Right.
RC 196 197 & 198 Knit across
RC 199 Decrease ~ transferring st 26 to 27. K to Right
RC 200, 201 & 202 Knit Across
SHOULDER SHAPING:
RC 203 Display reads R 27 ~ R 71. Machine beeps at you. It's time to begin shoulder decreases. K to Right.
RC 204 Display reads R 27 ~ R 68. you cannot shortrow the right shoulder when the carriage is on the right so leave all needles in place and knit to Left.
RC 205 Display reads R 27~R 63. Pull 8 needles on the right to E position so that needles R 27 and R 63 are in B position. Knit to Right.
RC 206 Display reads R 27 ~ R 60. Wrap yarn under needle # 64. K to Left.
RC 207 Display reads R 27 ~ R 55. Bring 8 needles on the right to E position. K to Right.
RC 208 Display reads R 27 ~ R 52. Wrap yarn under needles # 56, K to Left
RC 209 Display reads R 27 ~ R 47. Bring 8 more needles on the right to E position. K to right.
RC 210 Display reads R 27 ~ R 44. Wrap yarn under needle # 48 and K to Left.
RC 211 Display reads R 27 ~ R 39. Bring 8 more needles on the right to E position. K to right.
RC 212 Display reads R 27 ~ R 34. Wrap yarn under needle # 40, K to Left.
RC 213 Display reads R 27 ~ R 31 Bring 8 more needles on the right to E position. K to right.
RC 214 Display reads R 27 ~ R 27. Put all shoulder stitches in upper working position or D position and K to Left.
Remove garment yarn.
Thread up waste yarn and carefully knit back to Right. Knit at least 6 rows of waste yarn and remove right side from machine.
Push STEP
KNIT ONE SIDE is again showing on the display
Select your left side and press STEP
Prepare needles ~ pulling needles L 10 to D position. Push STEP to return display to positive
With carriage on left, knit across to the right
.Continue knitting just as you did for the right side. Remember to watch your display to know which needles to decrease and don't forget the short row rules.
At Row Count 214, you'll get the message, KNITTING IS COMPLETED.
The machine will beep.
Be sure to knit one last row across shoulder stitches and take left side off on waste yarn.
You have now completed 1 piece of your garment.
Try inputting the sleeve without my help. It's a symmetrical shape. You input it ~ starting at the lowest point and you only have to input half the sleeve.
Start at center bottom and end at center top. You'll be using Line # 4 for S 2.
Feel free to make copies of this article for your personal use or for use in classes. The following copyright notice must appear on all copies
Copyright Rosalind Porter, Piney Mountain Cottage 1997-2008
No comments:
Post a Comment