Thursday, February 14, 2008

Happy Valentines Day


Have you tried the Mystery Pattern yet? Well, its not too late to make it and here's why:


Donna-Jean in Ohio made this one, she said she had a lot of fun with it.


Clarisse from AZ says, I especially liked that I got an instant small pillow :)

Roz's Mystery, filled with fluff and a little potpourri, its hanging over the mirror in my car. (sock yarn by Knitivity.com--appropriately called "Cupid's My Hero") Check out how that color striped even when I shortrowed..way to go Ray!


And I saved this one for last .....here's why its not too late to knit your Mystery. Joan DelPozzo, Wales, ME says, This is themystery patten with all numbers cut in half. I can't take credit for thinking of this. My former dealer came up with the idea. The hat is based on the Marian Reynolds fruit hats.


Update--February 19th--Natalie decided to knit a shamrock after she saw the hat above. She and Melissa are going to put a pin on it and wear it on March 17th. What a good idea.......
Well, the Mystery is out but its still not too late to knit yours. Whether you make it red, pink or green or purple!!! we want to see it. Send Pictures!!!!

WAIT! did you miss the Mystery Pattern? Go HERE . We can't wait to see yours!


Saturday, February 2, 2008

It's February

I've spent the entire week working, not for pay of course. First I finished my little faux leather top cabinet, then I helped a friend set up a bookkeeping system and I hired a real estate company to sell my house. Boo Hoo, I've been dreading this because this means I have to clean the loft up and put up my toys. I have decided I have to live here though so whatever I'm doing at the time will be out, the rest will be put away (someplace). If I didn't live in the humid South, I'd put things in the garage but since I can't do that there's no option other than packing the boxes and here they sit!!! Oh well, its time to get on with it.

Remember, its February which means its Mystery Pattern month. Do send me pictures if you solve the Mystery. I'll post them, along with mine, here soon.

Sunday, January 27, 2008

What I do in my spare time


I've been painting between building a web page and knitting. Here's what happened. My DH had a file cabinet under his computer table that he set his coffee cup on as he read his email. I confess, I did the same. The cabinet was made out of that fake wood stuff -- you know, bits of sawdust glued together and called wood? It had a strip of glued on fake wood covering it. Well, after a million cups of coffee the top was looking horrible so I decided to paint it. I also have a cedar chest that I got when I graduated from High School a million years ago and it also is pretty beat up. I stuck the 2 back in the spare room and put plants on them for the winter but suddenly I had a brilliant idea. Why not try one of those faux paint projects on them? Back in the memory bank was a faux leather look from TLC's Trading Spaces. OK, you know what happened!!! I looked up the faux leather look on DIYTV's web page, bought the stuff and started in. I highly suggest if you try this, you do the faux work first, I did the flat black paint first and had to go back over it when it was finished because drips from the faux work hit the flat black putting glueish drips on flat black paint that washing didn't help.
I started with brown wrapping paper and tore it into little pieces. I laid them in a paper plate full of Decoupage Finish and plastered the little bits all over the top. After that dried overnight I painted the glued and sealed stuff with brown paint (called Leather Brown and it was way too light). I didn't like the look so then I painted again with a darker brown that I had mixed at the local Ace Hardware. This time I took a rag and patted the paint on with that. Then I took a picture. I've found photos help you find the flaws. After looking at the picture I did some more paperwork and more paint. Finally!!! I was ready to put on a few light coats of clear satin polyurethane. When done I let it sit a few days and then put on another coat of flat black on the base and after looking at my picture I see I need to take the drawers out and paint the insides of the cabinet but that's OK, I bought more flat black to do my cedar chest.
What I'll do on the cedar chest though is use tissue paper for the faux leather rather than brown wrapping paper. It looks ok on the cabinet but that wasn't what I really had in mind, I wanted more of a flat finish on it rather than the sort of bumpy finish I got with the brown paper. Still, my DH would have loved his newly finished cabinet and I like it too. Its going with me when I move instead of to the dump as I originally planned.
Oh yes, plant is back on it because that room has windows on 2 sides and that's where I keep my plants in the winter, they have to be up where they'll get as much daylight as possible. This particular plant is sick but if it survives the winter it will look better when it gets back out on the back porch where it's humid and hot in the summer. I only wonder what will happen if I take it North when I move. Poor thing!


Wednesday, January 23, 2008

Free Patterns Are Moving

FREE PATTERNS ARE MOVING TO http://www.pineymountaincottage.com/
I'm working as fast as I can to get my free patterns back up on a web site. The blog was a good idea but its not working because I needed links to .pdf and DAK files. A web page was the way to go. My daughter, Miki, is adding some new patterns too, I think I'll get them up first but today I have a volunteer job to do at Hagood Mill so I probably won't get much done on the computer today. Besides that, my favorite show is on TV tonight, Project Runway on Bravo TV. Love the show but luckily its on late so I may get something done between getting home and watching that and if I get involved with the computer I always Tivo it so that I can watch early in the a.m.

The Circular cardigan has been the subject of conversation on the Yahoo knittingmachine group as well as the LK 150 Yahoo Group. I charted it out yesterday and plan to knit it ASAP and get the pattern up on my new web site. Stay tuned, I'm excited about this cardigan, its so comfy and I just know using nicer yarn than the stuff the manufacturer used, it will be fabulous addition to anyone's wardrobe. Best part, we've tried it on skinny friends, chubby people, short people, tall people, I swear the thing looks good on everyone and I definitely need to find some comfy yarn to make it out of because it is as nice to wear as a bathrobe
Here's a picture of my grandaughter wearing it, unfortunately she would only would let me publish the picture if I took her head off (and she's beautiful...I hated cutting her head off).

Don't forget to get the Mystery Pattern and give it a try. I would love to put pictures of your finished "mystery" AFTER the mystery part is past. Of course you won't know what I'm talking about unless you knit it....so give it a try it's simple and fast and quite a surprise.

Saturday, January 19, 2008

No Fail Calculating your Sweater Sleeve Length

My formula will work no matter what style you are making. This isn't actually MY formula, it came from Pat Wetzel and it was so perfect I never forgot it......
1. You are making a sweater. You measure 31" from middle of back to end of cuff on a long sleeve sweater.
2. You personally measure 7 inches from middle of back to edge of shoulder and arm is 24 inches from that same edge of shoulder to cuff. (total 31)
3. You make a drop shoulder sweater that is 10 inches wide, middle of back to shoulder. (that's 3" wider than your shoulder)
4. You subtract 10 from your total of 31 (total length you need from middle of back) You would make your sleeve 21 inches. (in spite of the fact that your arm measures 24")

Does that make sense?EXAMPLES:Let's say you are making a short sleeve drop shoulder sweater.
You measure 7" from middle of back to shoulder.
You want the short sleeve to come down 7" from that same point at the shoulder.
Your sweater measure 10" from middle of back to edge.
If you make a 7" sleeve and put it on a 10" body, you'll be going down 17 inches which is too long.......your total length from middle of back to 7" down to where you want the sleeve to end is only 14" so you make the body which is 10" subtract 7 from 10, you need to make the sleeve 4" long.
If you make a set in sleeve: You measure 15" shoulder to shoulder ---or 7" middle of back to edge.

You want a long sleeve and measure 31" total (middle of back to bottom of arm).
Since your sweater body is made to fit 15"--it will measure 7" from middle to edge.
Now you need a longer sleeve--so make it 7 minus 31 or 24"
If you make a modified drop shoulder and it's 10" wide but you took off 2" at each edge for the modified drop.
You now have 8" middle of back to edge Make the sleeve 31" minus 8" or 23" It works!!!


Copyright, 1999-2008 Rosalind Porter Piney Mountain Cottage
The information, patterns and images contained on this page are for personal use and may not be altered, converted nor uploaded to any electronic system or BBS nor included in any compact disk (CD-ROM) or collection of any type without the express written permission of Rosalind Porter.

Thursday, January 17, 2008

HOW TO CALCULATE YOUR OWN PERSONAL SOCKS

Print this page out, you can use it as a worksheet and as your pattern.
Figuring your own sock pattern is so liberating. Now you can look at a pair of socks in a store or magazine and knit your own, using a worksheet! YIPEE!

ADULT SOCK
PART 1: Measuring

NOTE if you are knitting a knee length sock you need to decrease evenly so that the sock will fit up on the calf as well as around the ankle. If you are knitting a regular crew or ankle length sock you won't need to figure decreases, just measure your ankle and cast on accordingly. If you are knitting a fairisle pattern, don't forget to turn it upside down.

Get out your paper and pencil and calculator:

1. Make a swatch and measure for stitches (spi) and rows (rpi) per inch
spi=_______rpi =_______
2. Measure width of ankle _________inches x spi = ______
3. Measure width of top of sock (where you want sock to end) _________inches x spi =______
4. Figure out how many inches you want the top rib or hem to be ____inches
5. Measure length of top of sock to ankle in inches less desired hem _____inches x rpi =_____
6. Measure length of foot on bottom of foot, subtract 4" for heel and toe _____inches x rpi _____

PART 2: KNITTING YOUR SOCK

RC 00 Cast on __________STS (# 3 above) Knit or rib your hem
For Knee Length socks, figure your decreases now. Formula is:
a: # 3 minus # 2. (#3 spi - #2 spi) = _______.
b: Figure Rows per inch x # 5 above = _______.
c: Divide b by a ____ = decrease rows i.e. if your answer is 4, you decrease each side every 4 rows until you are down to desired ankle stitches ( # 2 above).
Sometimes it's going to be necessary to refigure this, for instance, I needed to decrease 45 stitches in 63 rows for a short/fitted sock. According to the formula, I should decrease 2 stitches every 3 rows but when I finished I had only decreased 42 stitches, I needed to add a couple "every other rows" in that decrease formula to make it come out).

RC 00 Knit in desired pattern to RC _________ (# 5 above)--following decreases as above if necessary
RC 00 Short row for heel: You want to short row 2" for an adult heel, # 1 rpi x 2= ____________rows to shortrow
i.e. if you have 7 stitches per inch, you would shortrow 14 rows down and 14 rows back up as follows:
Carriage on right push in hold buttons. Pull all needles left of 0 to Hold position. Pull 1 needle next to carriage to hold position and knit acrossContinue pulling 1 needle next to carriage to hold position for 14 rows (or # of rows to = 2 inches).
Reverse shortrow by pushing 1 needle opposite carriage back into work, wrap 1st stitch on carriage side and knit across.
Continue pushing 1 needle opposite carriage back into work and wraping the 1st stich on carriage side until all needles are back in work.

RC 00 Knit ___________ rows (#6 above)
Short row toe same as heel (2") __________rows.

NOTE: If you want the seam to end on top of the toe, shortrow toe on same side you did the heel. If you want the seam under the toe, shortrow the toe on the opposite side of the heel. i.e. you shortrowed the heel on the right. Shortrow the toe on the right for seam on top or knit 1 extra row so that carriage will be on opposite side so toe will be shortrowed on opposite side of sock.

Knit 1 row across all stitches. Divide stitches in half and take each side off separately on ravel cord and waste yarn, fold in half and kitchener stitch seam.

NOTE: If you want to fold your ribbing down, be sure to mattress stitch on the wrong side half way down the ribbing, then turn to the right side and finish the seam.

ps....see note about decreasing above. The worksheet figures straight line decreases

Make yourself a spread sheet file or get a notebook to help you chart socks. Included my worksheet below to show you how I did mine

Width of ankle in inches 9
w of top in inches 15
L of top to ankle in inches 9

L heel to toe in inches 6

PART 2, KNITTING

RC 0 cast on 105 stitches

Knit to RC 90

Desired sts at ankle 63 sts

Dec 42 sts or 21 each side to 63 sts then continue knitting to RC 90

Dec formula
dec every 4 rows to R 90

Short Row Heel
14 rows of shortrowing

Reverse short row back until all stitches are back in work

Work to toe 60 rows

Short roe toe as heel

Reverse short row back as for heel
Knit 1 row across

Divide the work in half and take each side off on waste separately
Fold in half and Kitchener toe, mattress stitch seam
side seam

Make second sock exactly same only complete shortrowing on opposite side so
seam will be on the inside


I hope this page will help you figure your own socks Roz Porter, Piney Mountain Cottage

This page is my little invention with some help from friends. Feel free to use it and even pass it along to your friends if you wish but be sure to mention where you got it. Thank you!

Tuesday, January 15, 2008

Working with the Brother 970 Garment Creation


People have told me that they absolutely love the 970 Stitchleader (Knitking's Compuknit 5 Star) but that they have problems putting their garment shapes into it and others know how to get the shape in but have a problem knitting it from the little screen. Knitting with this machine should be a dream. This machine has it all, the patterning, the shapes, everything but a built-in robot to push the carriage.

I've been thinking, if we put in a standard drop shoulder sweater, all we'd have to do is make a few changes when we want to change the shape, make a tension swatch and start knitting. So, once you get your basic drop shoulder garment into your machine, you can save it if you have a floppy disk drive. Unfortunately, DesignaKnit is not equipped to save garment shapes and I don't know if it ever will be. If you have a blank cartridge, you can fill up the machine's memory and then save to the blank cartridge. Don't save to it until your machine is full because it will erase everything on the cartridge when it saves.

Once the personal basic drop shoulder sweater is in the machine it should be an easy matter to change the garment into a tunic, a V-neck, etc. All you have to do is go back to the garment front and back and using the Garment Alteration Icon add some length from underarm to hem on the front and back or change the neckline to a new one. You can change it into a cardigan going into Garment Creation and make a new front that is non-symmetrical and use the original back and sleeve. I can see lots of possibilities with having a standard shape that fits me in the machine, ready and waiting. Just be sure to keep a notebook of what you've done each time you've changed the garment so that you can always go back.


I came up with a fairly standard 40 inch drop shoulder pullover that is easy to input and knit but it does include some shaping. If you are having problems with the garment shaping options of the machine, try this simple little pullover. If you are having problems with the actual knit from screen directions, go ahead and put the garment shape in and pretend to knit it along with me. You can always delete the whole thing later and put in your own personal garment. It's possible to input a garment measurement into the machine in inches however metric is so much more accurate, it's better if you use centimeters.


Even so, I am so used to inches, my poor mind sees in inches....so I chart in inches and once I'm done, I convert to centimeters. I bought a calculator at Radio Shack called a Pocket Handyman. It converts from inches into centimeters for me. Simply put in the inch amount, push "inch", push "=" push "centimeters"....you've got your metric conversion!


In my schematic, I have not included measurements for ribbings. There is no need to input ribbing allowances on the machine in my opinion. I always suggest that whenever you put a garment into your machine, you FIRST draw it out on paper, make a note of your measurements and the number that the machine assigned that particular garment. Also be sure to note the Stage Numbers that you will be inputting. It's easy to get distracted when you are putting something into the machine; this will help remind you when you get back to it if that happens.

To start, here's what I'd like you to do. Go ahead and input the measurements as I've given them. Later you can delete the garment from your machine and put in your own garment but this is a practice exercise so let's practice and learn. We'll input the garment, put in a gauge and pretend to knit. For our exercise, these are the icons we'll be using:
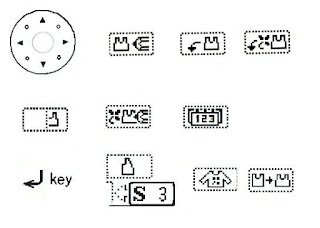
Top L to R: Direction key, Garment Creation, Garment Position Input, Positioning Program Middle L to R: Symmetrical Shape, Designing Program, Row Counter Set Up
(not shown, X =Width, Y – Length)
Bottom L to R: Step Key Stage Number, Knitting Icon, Garment Alteration
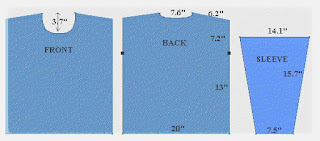


FRONT: S5 Y = 9.3 cm (3.7 in)
SLEEVE: S1 X = 9.5 cm
BACK: S1 X = 25.4, cm S1 Y - 42.4 cm, S2 X = 33 cm S2, Y = 42.4 cm, S3 X = 18.3 cm S2 X = 8.9 cm, S4 X = 15.7 cm, S3 X = 18.4 cm, S4 Y = 2.7 cm, S5 X = 9.7 cm, X5 Y = 1.2 cm

Let's input our sweater front. Turn on your machine and with the DIRECTION key arrow over to the DESIGNING PROGRAM icon. Press STEP.
Now select the GARMENT CREATION icon. Press the STEP key.
Number 1 will show on your screen along with 2 shapes, a symmetrical shape and a non-symmetrical shape.
The number 1 is your garment number, record it now.
Since this is a pullover, both sides are exactly alike from right to left therefore this is a symmetrical shape. Because it's a symmetrical shape, the machine knows it can mirror image and you only have to put half the garment in, starting at the center lowest point. Choose this shape then press the STEP key.
S1 appears on the screen to notify you that you are about to input the Stage 1 number. The Stages are the various shaping lines you'll need to enter for each separate part of the garment, they are shown at the top left of your CB-1 controller. Push the STEP key.


We will be putting in 1/2 of our garment, starting with the center bottom and going counterclockwise so shape 1 will be the #1 figure shown at the top of your CB-1 controller. It's 1/2 the bottom width of your sweater. Push the Number 1 key and then push STEP l.
Press STEP again.

X=? We have to tell the machine how wide our garment will be. Refer to our schematic. Our garment is 50.8 cm wide. Put in the number 25.4 (starting from center bottom, 1/2 of our 50.8 cm). If you accidentally put in the wrong number simply push C and then continue with the correct number. Push the STEP key.

S2 appears. Push STEP. Line #2 represents our vertical rows up the pullover. Select #2 as your shape line and press STEP. Press STEP again.

Y is your vertical measurement. Your length to underarm is 33.0 cm. (we could go on up to our shoulder line for this but we want the machine to remind us to put in an underarm marker). Input 33.0 and press STEP. S3 appears. Press STEP.

Put in Line #2 again (your vertical line from underarm to shoulder). Press STEP.

Y=? Again you need to put in the vertical measurement. Your underarm to shoulder is 18.3 cm, punch in that number and press STEP.

S4 appears. Press STEP.

Line 4 is our shoulder. We have a 1" slant to our shoulder, slanting up to the neck. Push line #3 for this stage. Press STEP.
Press STEP again.

X=? This is our horizontal measurement. That measurement is 15.7 cm. Input 15.7. Press STEP.

Y=? The length of our slant is 2.7 cm. Input 2.7 and press STEP.

Stage 5 is our last shape. Push STEP.

We'll use the curve #10 for this. Push 10 and then push STEP.

The first Icon which is slanted down to the left should be blinking, push STEP.
Your X measurement (horizontal) is 9.7 cm Punch 9.7 into the machine and press STEP.
Your Y measurement (vertical) is 9.3 cm. Punch 9.3 into the machine and press STEP.

We came to END. This means we didn't make a mistake with our measurements and we are now ready to knit. Make sure to push the STEP key to finish your creation. Then the main menu appears on the display.

If you had measured just a little off at this point, you could put in a straight horizontal line to make the neckline go to the middle. The secret here is to put in a large line...(10 cm). The machine will come back and tell you that you can only put in a short line and it will give you the measurement you need. If you need to go back to a previous stage, you can do that but only when you are at a place where the machine says "STAGE #" At that point, just arrow back where you need to be.

KNITTING OUR GARMENT: To continue on with our exercise, let's pretend we are knitting our garment. If you already know how to machine knit but haven't knit from screen before, this will be a little different for you. You need to learn to watch your display window and follow the "needles in work" numbers.

Let's also take a minute to review shortrowing procedures:
1. It’s easiest to shortrow the needles opposite the carriage, K across then when the carriage is on the shortrow side, wrap the last needle in hold (next to the last working stitch). Knit 2 rows and repeat. To do this, check the "needles in work" numbers in the display when your carriage is opposite the part you want to shortrow . The numbers in the display are the needles in work numbers.
2. When you have more than 2 rows between a shortrow (i.e. the pattern says, decrease 3 stitches every 3rd row) it's time to stop shortrowing and manually decrease the stitch ~ placing it on the working needle next to it.

Now we can knit our garment.
I chose a standard gauge of 7 sts and 10 rows for our sample. Or 40 sts = 14.5, 60 rows = 15.2

Arrow to POSITIONING PROGRAM and push STEP
Arrow to GARMENT POSITION INPUT and push STEP
Choose the 40 X 60 Icon and push STEP
Input 14.5 for your width and push STEPInput 15.2 for your length and push STEP
If this is your first garment, G1 will show on the screen. If not, select your garment shape number and push STEP.
If you get a "Garment # has not been completed" notice, go back to the GARMENT DESIGN icon, select the GARMENT ALTERATION icon and step through the process to END.
Now Press STEP and you should be able to go back to GARMENT POSITION INPUT.

Go to the ROW COUNTER SET-UP icon to select Row Count 0
Go to the KNIT ICON and you're ready to knit.

Now, rather than actually threading up and knitting the whole garment, why don't you go back to ROW COUNTER SETUP and set your beginning row count number to 176. The machine's display window tells you that you have needles 71 on the right and 71 on the left in work. Without putting any yarn in the carriage, let's just knit the neck shaping and see what happens.

Pull needles L 71 to R 71 into B position. Place your carriage on the right and knit to the left.
RC 177, the machine beeps. It's telling us that we are going to knit 1 side of the garment.
Arrow to the right.
Push the STEP key.
Your display turns to negative but it shows you that needles R 10 ~ R 71 are in work.
Prepare your needles this way:
All needles left of 0 should be pushed out to E position.
Also push needles 0 to 9 on the R side of 0 to E position.
Now needles R 10 to R 71 will be in B position.
Put your carriage in hold. Push the STEP key.
Your display returns to normal. You're ready to shape your right side.

NECKLINE SHAPING:
RC 178 K to right. Display says R 12 ~ R 71. Push 2 needles at the center (neckline) to E position. K to left. RC 179 Display says R 14 ~ R 71. You don't want to shortrow 2 sts on neck while the carriage is on that side so ignore the display and K back to the right.RC 180 Display reads R 16 ~ R 71.
Bring 4 sts on the neck side (L) to E position. K to Left.
RC 181 Display reads R 17 ~ R 71. You can shortrow 1 st on the neck, bring stitch 16 forward to E position. There is no need to wrap when you shortrow 1 st on the side of the carriage.
K to the Right.RC 182, 183, 184, 185 bring 1 st on left to E position.
Carriage ends on R, K to left.
RC 186 Display reads R 21 ~ R 71.
Continue knitting to Left.
RC 187 & 188 Bring 1 st on left to E position, K across.RC 189 Knit to Right
RC 190 Begin manually decreasing ~ transferring st 23 to 24. Push needle 23 to A position. K across.
RC 191 & 192 Continue knitting across
RC 193 Knit to leftRC 195 Decrease ~ transferring stitch 25 to 26. K to Right.
RC 196 197 & 198 Knit across
RC 199 Decrease ~ transferring st 26 to 27. K to Right
RC 200, 201 & 202 Knit Across

SHOULDER SHAPING:
RC 203 Display reads R 27 ~ R 71. Machine beeps at you. It's time to begin shoulder decreases. K to Right.
RC 204 Display reads R 27 ~ R 68. you cannot shortrow the right shoulder when the carriage is on the right so leave all needles in place and knit to Left.
RC 205 Display reads R 27~R 63. Pull 8 needles on the right to E position so that needles R 27 and R 63 are in B position. Knit to Right.
RC 206 Display reads R 27 ~ R 60. Wrap yarn under needle # 64. K to Left.
RC 207 Display reads R 27 ~ R 55. Bring 8 needles on the right to E position. K to Right.
RC 208 Display reads R 27 ~ R 52. Wrap yarn under needles # 56, K to Left
RC 209 Display reads R 27 ~ R 47. Bring 8 more needles on the right to E position. K to right.
RC 210 Display reads R 27 ~ R 44. Wrap yarn under needle # 48 and K to Left.
RC 211 Display reads R 27 ~ R 39. Bring 8 more needles on the right to E position. K to right.
RC 212 Display reads R 27 ~ R 34. Wrap yarn under needle # 40, K to Left.
RC 213 Display reads R 27 ~ R 31 Bring 8 more needles on the right to E position. K to right.
RC 214 Display reads R 27 ~ R 27. Put all shoulder stitches in upper working position or D position and K to Left.
Remove garment yarn.
Thread up waste yarn and carefully knit back to Right. Knit at least 6 rows of waste yarn and remove right side from machine.
Push STEP
KNIT ONE SIDE is again showing on the display
Select your left side and press STEP
Prepare needles ~ pulling needles L 10 to D position. Push STEP to return display to positive
With carriage on left, knit across to the right
.Continue knitting just as you did for the right side. Remember to watch your display to know which needles to decrease and don't forget the short row rules.
At Row Count 214, you'll get the message, KNITTING IS COMPLETED.
The machine will beep.
Be sure to knit one last row across shoulder stitches and take left side off on waste yarn.
You have now completed 1 piece of your garment.
Try inputting the sleeve without my help. It's a symmetrical shape. You input it ~ starting at the lowest point and you only have to input half the sleeve.
Start at center bottom and end at center top. You'll be using Line # 4 for S 2.

Feel free to make copies of this article for your personal use or for use in classes. The following copyright notice must appear on all copies
Copyright Rosalind Porter, Piney Mountain Cottage 1997-2008